Sigma 24mm f1.4

Taking The Long Way To The Main Range Track, Kosciusko National Park

Earlier this year myself and my friend headed the long way down to Jindabyne via Tumut to tackle the Main Range Track. The Main Range is a 21km-odd track within the Kosciusko National Park taking in everything from glacial lakes to dramatic alpine tors. It had been a while since I had travelled, or hiked, since COVID, so expectations were high.

We found this abandoned service station in Marulan, a former highway town. I love places like this which sum up the Australian roadtrip experience.

We found this abandoned service station in Marulan, a former highway town. I love places like this which sum up the Australian roadtrip experience.

We headed off the main highway through some of the smaller towns the highway has forgot, such as Marulan. As always, I’m a sucker for anything abandoned and old, retro and interesting. I was also quite fond of the mix between old and new in Goulburn. I still enjoy this type of photography, seeking out the mundane. When I’m looking for things to photograph, I don’t consider the subject at all, but instead look at things only in terms of shape, line and colour. I have found it helps if whatever I’m shooting is also in direct sunlight.

I became obsessed with signage during this trip, trying to lend a bit of space to my compositions far more than I normally would and ‘group’ elements together.

I became obsessed with signage during this trip, trying to lend a bit of space to my compositions far more than I normally would and ‘group’ elements together.

Here is another example. Once I would have taken out the power lines and additional light in the bottom right, but I think they all work together, almost like a compositional jigsaw puzzle.

Here is another example. Once I would have taken out the power lines and additional light in the bottom right, but I think they all work together, almost like a compositional jigsaw puzzle.

Once we reached Jindabyne, to be met with double rainbow over the lake, the forecast was not good for our hike the following morning—torrential rain and thunderstorms. Alas, we woke and the conditions were near perfect heading up to Charlotte’s Pass.

After a close call crossing the river, we headed up to some of the best light I’ve seen in quite a while. My friend and I had been meant to hike New Zealand’s Tongariro Crossing last year, so this hike was to essentially make up for that. I must say, the Main Range Track/Walk was far more scenic than I thought it would be, especially once you got up to Blue Lake and onwards.

The early morning light was fantastic on the Main Range, the cloud sweeping in and out of the landscape.

The early morning light was fantastic on the Main Range, the cloud sweeping in and out of the landscape.

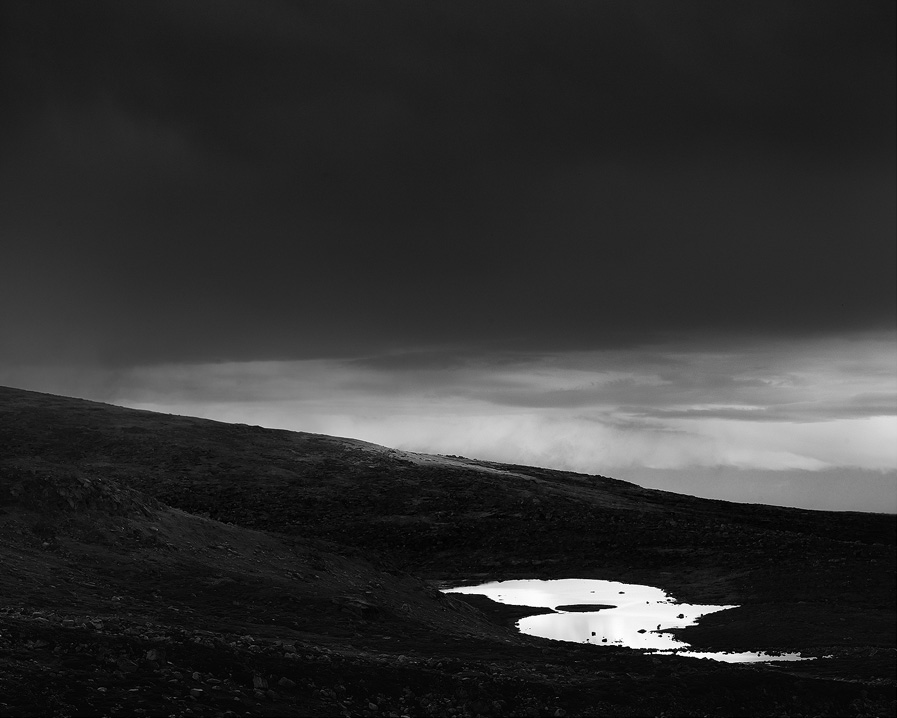
I struggled with this image for a long time until I realised a low-key black-and-white look would suit it well.

I struggled with this image for a long time until I realised a low-key black-and-white look would suit it well.

Apparently Blue Lake is 28 metres deep and boasts the freshest water in mainland Australia due to its low salt content. We took the detour down to the water’s edge. It was certainly clear and inviting, but one finger dip into the water told me I’d come out an iceblock if I ventured in for a swim.

Blue Lake had exactly the kind of scenery I was after. The light coming from the right was perfection—It felt like nature’s own softbox. As for swimming, though…

Blue Lake had exactly the kind of scenery I was after. The light coming from the right was perfection—It felt like nature’s own softbox. As for swimming, though…

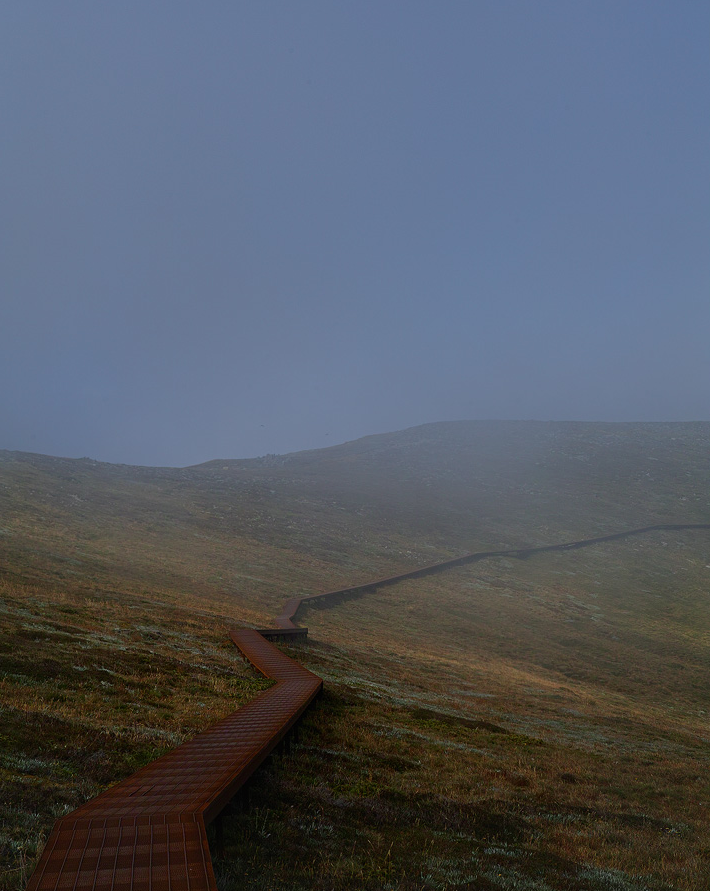
The weather changed quite dramatically the higher we got. We moved into the clouds and the views vanished along with visibility. This made for some of my favourite shots. When shooting traditional landscapes like this, I prefer adverse weather, silently cursing whenever there’s a blue sky. That’s quite the opposite from what I look for with my ‘mundane’ photos, so it’s nice to have both worlds.

This is one of my favourite images from the trip. There is a danger when you open Levels for an image like this and see how dark it is to bring up the whites, but I think it works far better remaining dark and moody. It adds mystery and is far more …

This is one of my favourite images from the trip. There is a danger when you open Levels for an image like this and see how dark it is to bring up the whites, but I think it works far better remaining dark and moody. It adds mystery and is far more faithful to the actual conditions.

We hit Mount Kosciusko mid-morning and from there the track improves. There were quite few people heading up the summit, including a few in wheelchairs and even a guy in thongs. It’s not exactly a killer climb. From Australia’s highest toilets and it’s then a looooooong fire trail back to Charlotte’s Pass. At times it seems never-ending, but we made it and headed back to Jindabyne Brewery for a well-deserved drink.

Finally, we wrapped our trip up at Bermagui on NSW’s South Coast. I had seen this spot below on a few social media feeds and had to check it out. At first we could not figure out how to get down to the rock shelf, but perseverance over the headland got it done. It ended up being far easier than we expected. It’s been a very long time since I shot a traditional seascape like this. I got a bit frustrated with the processing. It’s been a while!

This is spot is a photographer’s favourite on the NSW South Coast. As far as seascapes go, it would be hard to find better. In fact, the whole coast around Bermagui is full of dramatic rock formations like this.

This is spot is a photographer’s favourite on the NSW South Coast. As far as seascapes go, it would be hard to find better. In fact, the whole coast around Bermagui is full of dramatic rock formations like this.

Yet again I used the Sigma SD-H for this trip and the Sigma 50mm f1.4 ART for most of the shots, pulling out the 24mm f1.4  on occasion when I needed a wider angle. I was really hoping to see Sigma’s full-frame Foveon camera this year, but I do respect Sigma for holding back on a product they are not completely behind. I have been eyeing off the GFX50R again, so we’ll see if I make the jump.

If you can make it out to the Main Range Track, Kosciusko or any of the smaller towns listed, it’s well worth it. Australia needs the tourism dollar more than ever. Head here to check out the full gallery of images from the trip.

Regional NSW With the Sigma SD-H

Coming into the end of 2019 I realised I hadn’t had any photo trips per se. So, commitments aside, we headed off on a weekend road trip to regional NSW moving through Lithgow, Bathurst and Parkes.

This is the Bilpin Fruit Bowl, a spot I remember from many childhood mountain travels. I’d envisioned this shot for a long time but only now have got around to it. Sadly, two weeks later the fruit bowl was mostly destroyed by bushfire.

This is the Bilpin Fruit Bowl, a spot I remember from many childhood mountain travels. I’d envisioned this shot for a long time but only now have got around to it. Sadly, two weeks later the fruit bowl was mostly destroyed by bushfire.

The initial thing that struck me was just how dry it is out there in the country thanks to one of the worst droughts in Australian history. Many locals we spoke to indeed said it was the worst they had experienced. The rivers, dams and creeks were all bone dry, the land scorched and barren. This created constant dust and haze in the sky, which did make keeping the sensor clean (or not, rather, given how much the clone tool got a workout) interesting.

We pulled into our hotel at Parkes just as a dust storm engulfed the town. I ran across the road and was subsequently sand-blasted taking this shot.

We pulled into our hotel at Parkes just as a dust storm engulfed the town. I ran across the road and was subsequently sand-blasted taking this shot.

I especially like the banality of these country towns and the unique compositions they offer. We swung by the Parkes Historical Aviation Restoration Museum, which was especially photo-friendly. The texture and details in the planes was exquisite and could have kept me there for hours. Also worth a look was the State Mine Heritage Park in Lithgow, a real hidden gem I personally had never been to before.

The Chinese restaurant is a real country town staple in Australia. I have a particular fascination for them.

The Chinese restaurant is a real country town staple in Australia. I have a particular fascination for them.

I changed my processing a little for these images, using new LUTs I have created, though I can’t say I’m completely satisfied with the consistency between them all. This was made especially hard with the constantly changing sky and light conditions owing to the dust, plus ash and smoke from the NSW bushfires further afield.

The Historic Aviation Restoration Museum (HARS) in Parkes is a must-visit for photographers

The Historic Aviation Restoration Museum (HARS) in Parkes is a must-visit for photographers

As always, I was impressed with the detail picked up by the Sigma SD-H, especially in the textural abstracts I was taking. It’s almost ridiculous how much it soaks in. I did find myself jumping a lot between the 50mm 1.4 and 24mm 1.4 this time, which probably tells me I should be looking into the L-alliance 24-70mm Sigma has just released. I will also be extremely interested to see Sigma’s full-frame Foveon offering in 2020 and what advantages it provides over the SD-H. Increased dynamic range would be most welcome.

Having visited the region many times, I was surprised by how dry the drought has made it

Having visited the region many times, I was surprised by how dry the drought has made it

In 2020 I’m hoping to step up my landscape photography and get out to some new places, hopefully international. I still don’t think I have a signature style as such yet, and that’s what I’m hoping to explore, as well as constantly refining and minimalizing my compositions in the vein of excellent photographers like Bruce Percy and David Ward. Here’s to a new decade and new possibilities (and hopefully some rain for this sun-burnt land). See the full set of images by clicking here.

As we were coming home multiple bushfire fronts had sprung up, including this blaze near the Three Sisters at Katoomba. Since then the fires have spread in what has been one of the worst fire seasons on record so far. You can see one of the choppers…

As we were coming home multiple bushfire fronts had sprung up, including this blaze near the Three Sisters at Katoomba. Since then the fires have spread in what has been one of the worst fire seasons on record so far. You can see one of the choppers at work in the middle there.

A Guide To ICM Photography

I have been getting quite experimental with my photography this year and recently stumbled upon ICM, or Intentional Camera Movement photography. I fell into the work of photographer Andy Gray and was immediately blown away by the painterly feel of his images.

An ICM photo of Hornby Lighthouse in Sydney, Australia, my first attempt at the technique.

An ICM photo of Hornby Lighthouse in Sydney, Australia, my first attempt at the technique.

Thankfully, Andy has a wonderful YouTube channel where he breaks down step-by-step his entire process, from capture to post-processing. I definitely recommend checking it out to see just how much work goes into each image.

An ICM photo of the Sydney Opera House. Another ICM image of poppies from the Botanic Gardens has been used as a second exposure layered over the first.

An ICM photo of the Sydney Opera House. Another ICM image of poppies from the Botanic Gardens has been used as a second exposure layered over the first.

What’s required? Well, a camera, though megapixels don’t really matter given the abstract nature of the finished product, and also an ND filter. It seems something between a 6-stop and a 10-stop is what work’s best, allowing exposures within the 0.5-1.5sec  range during the middle of the day. If you wanted to skip the filter, I suppose you could shoot closer to sundown and sunrise where the exposures would be longer handheld. Like everything with this technique, however, there are no hard and fast rules. It is all about experimentation.

I opted for a 6-stop in 77mm to suit my Sigma 50mm f1.4 and also 24mm 1.4, a wider lens being the preferred option. At around $100 AUD, it’s not a terribly expensive way to get into ICM, plus you can use the filter for more traditional purposes.

The Sigma SD-H itself probably isn’t the best choice of camera. It buffers slowly and the RAW files are tedious to process when you get back home, requiring you to be somewhat picky when it comes to post-processing. Expect to take a lot of photos.

Another ICM image of Hornby Lighthouse. This one reminds of the famous aerial shots of Shark Bay in Western Australia

Another ICM image of Hornby Lighthouse. This one reminds of the famous aerial shots of Shark Bay in Western Australia

As for the process, if you watch Andy’s videos you’ll get an idea of the movement required. I set f11 and around 0.5sec, starting with a shaking motion and then a longer, whipping motion. I slowly worked up to longer exposures, trying to follow lines within the scene. It’s very much like painting… with a very expensive brush.

If there are people around, note this: You are going to look like an absolute idiot. One guy suggested ‘I don’t think that’s how you use a camera, mate’. I simply smiled back, not able to dial up a suitable comeback in time. I found the best results were when I really got into it, almost violent in the movement in able to create the required textural effect.

It’s also important you start with a regular composition in mind, just as you would if you were taking a traditional landscape. You need a prominent feature or point of interest the abstraction works around. So, frame up the scene as would normally and then go to town. I don’t have any castles or ruins nearby like Andy, but I do have Sydney Harbour and its many wonderful icons.

Another important point is to beware of highlights. It was an extremely bright day when I first tried this. Any small highlight source within the frame can easily ruin a shot by basically slicing it up with pure white. It’s a little hard to explain, but if you think you see specular highlights that are going to be blown out, avoid them in your movement.

This animation shows how the image at the top of this post was created using layers within Photoshop.

This animation shows how the image at the top of this post was created using layers within Photoshop.

Into post-processing and I simply looked for frames that stood out where the movement seem right and balanced, or the texture was right. From there it’s into Photoshop, stacking up the layers and running through masks and blend modes to find an initial base to work from.

Once the initial image has started to come together, it’s into Analog Efex Pro 2. Here, Andy uses a variety of tools to help further abstract and shape the image, but notably vignette, double exposure (inverting the image) and film effects. I found it also helped scrolling through the factory camera presets within Analog Pro 2 to see if anything worked, especially the ‘Motion’ cameras. Andy also uses Vivuza for spot adjustments, but I didn’t feel the need myself. As they say, there are lots of ways to skin the cat in Photoshop.

I think of post-processing in two parts: Colour and contrast, effectively leaving colour until last. I tried a curves layer first, adjusting RGB channels individually, but I couldn’t seem to make it work. Instead, I loaded up a LUT adjustment layer and simply scrolled through all the LUTs I have on file (which is quite a few) until I found something I liked and adjusted opacity from there. The Selective Color and Hue/Adjustment layers were good for fine-tuning.

Finally, I let the images sit there for days at a time, slowly tweaking until I thought they were good enough. It’s very easy to get stuck in a kind of ‘post-processing loop’ with these sorts of images, constantly adding and removing adjustment layers and masks, tweaking and tweaking and circling back on yourself. When I found myself doing this, I would turn off all layers except for the base exposure and add them back one by one adjusting as I went.

The above images show the interesting detail when seen at 100%.

Overall, I think I’m pleased with the results, though they are not what I expected at all. That’s the beauty of a style like this: You don’t know what you’re going to get. I’d love to make some prints and really study them.

I will say it was extremely frustrating at times. The images took a lot longer to process than usual largely in part because so much trial and error is required. It is rewarding, though, when you finally have something on screen that doesn’t look like a dog’s breakfast.

If you’d like to support Andy and his channel, you can do so here. Look out for more ICM work in the future.

An abstract view of Sydney Harbour created using the Intentional Camera Movement technique. Note what happened with the specular highlights on the water in the bottom right, but in this case I think it works.

An abstract view of Sydney Harbour created using the Intentional Camera Movement technique. Note what happened with the specular highlights on the water in the bottom right, but in this case I think it works.