South-East Asia With The Fuji GFX50R

It’s been a long time since I travelled overseas so extensively. Perhaps it was almost fifteen years ago when my wife and I did a whirlwind tour of Europe. There was the pandemic messing with things, sure, and trips to New Zealand and Fiji, but nothing substantial. So it was over Xmas the family and in-laws embarked on a four-week tour of south-east Asia.

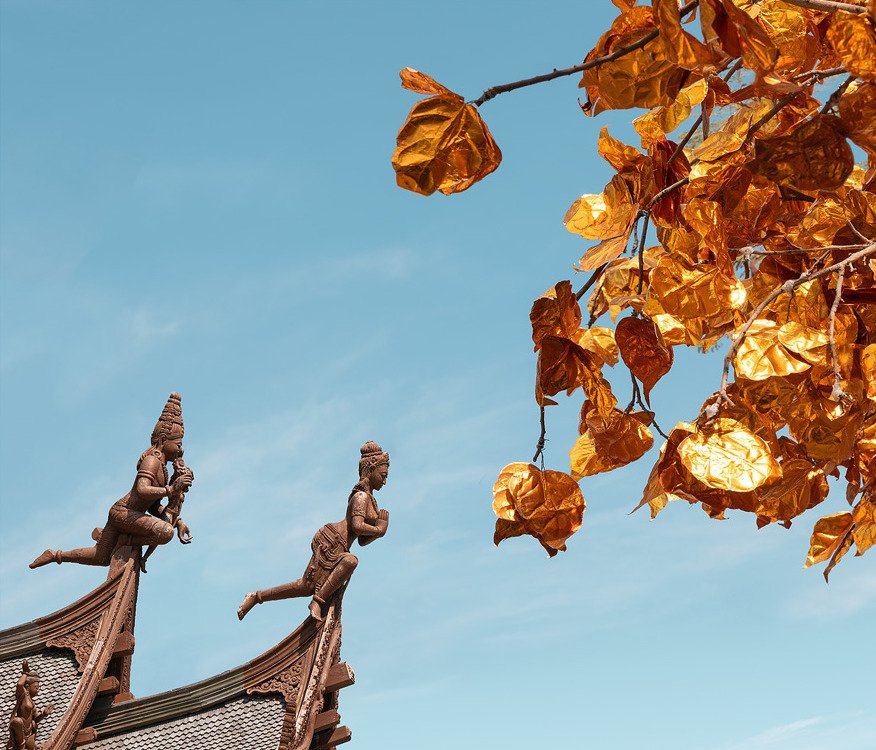
A image from the Sanctuary of Truth in Pattaya, Thailand. It’s not a temple per se, but a collaborative ongoing work that is incredible to see just in terms of sheer detail, but it was this gold-leaf tree outside that caught my eye.

Coming into this trip, I was not expecting much in the way of photography. Bar a singular exception, all my photography is shoehorned into family vacations. There’s none of this carefully planning locations and returning multiple times for the perfect light and conditions—not with kids. No, what I do these days is more of a photojournalistic take on things where you simply shoot in the moment with whatever light you have. And make no mistake, there are quality photos to be made in every kind of light and of almost any subject matter.

How do you take an original photo of such an iconic location? That became the ongoing challenge of this trip. This was the exterior of one of the famous Singapore ‘domes’ with the Singapore flyer in the background.

So it is when I’m taking photos on trips like this where we are rushing around and fighting crowds in touristy areas, it can be difficult, but I tried my best to make it work and actually came away quite liking some of these images.

We started with a few days in Singapore, which was hot, of course, and humid, of course, but also rather interesting from a visual standpoint with its mix of Asian and western influences. I personally found getting out to Little India and the old quarter more interesting than Orchard Rd, but Santosa Island was nice and I think the city as a whole definitely warrants further exploration in the future.

Above are images of the Former House of Tan Teng Niah in Little India, Singapore, or simply known on Google Maps as ‘Instagram Location’. I loved this building, especially the image on the far left that looks like it was taken against a green screen. My son also managed to get a very stylish haircut nearby.

Following Singapore we had a two-week cruise around Thailand and Vietnam. We were unable to tender in Koh Samui, which was a bit of a letdown, but we did get off in Pattaya to see the very impressive Sanctuary of Truth, the floating market and so on. Next time, I will remember the golden rule that cash is still king in SE Asia.

I really loved Vietnam—the culture, the food, the myriad of colours… Hoi An in particular, which we only had an hour at, mind, was just a photography dream with its yellow buildings and colourful merchandise. Halong Bay was also extraordinary and definitely gave me flashbacks to James Bond’s The Man With Golden Gun, which I watched endlessly as a kid. Cruising around the bay on a junk was perfection.

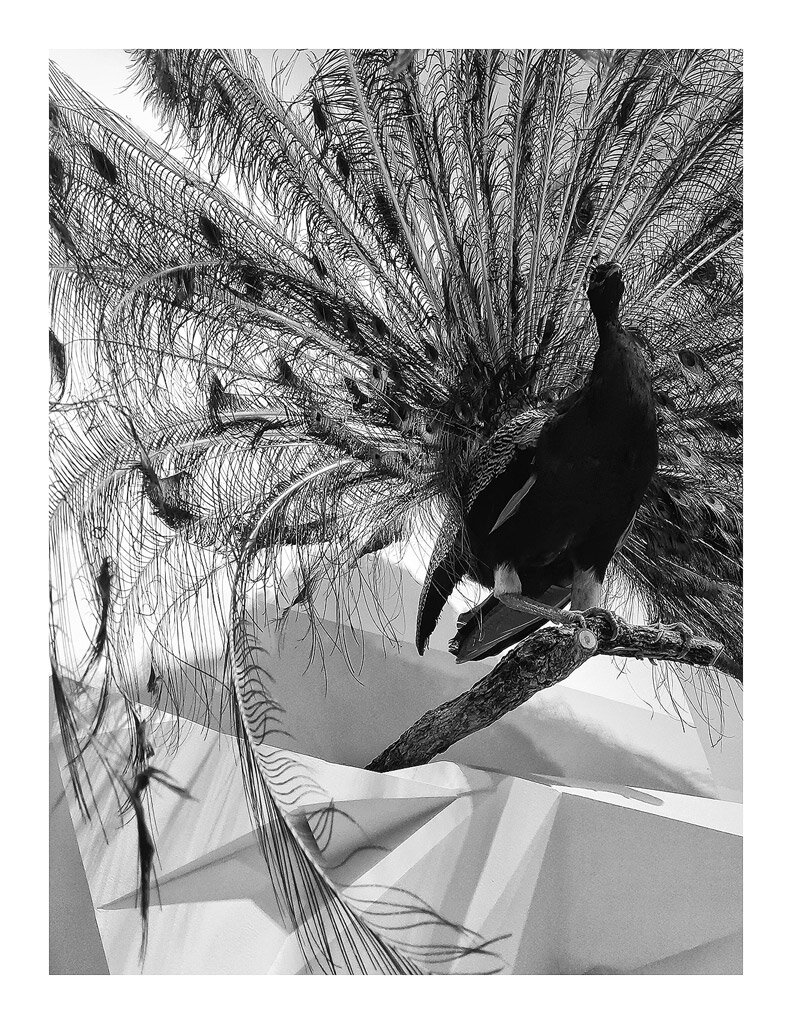
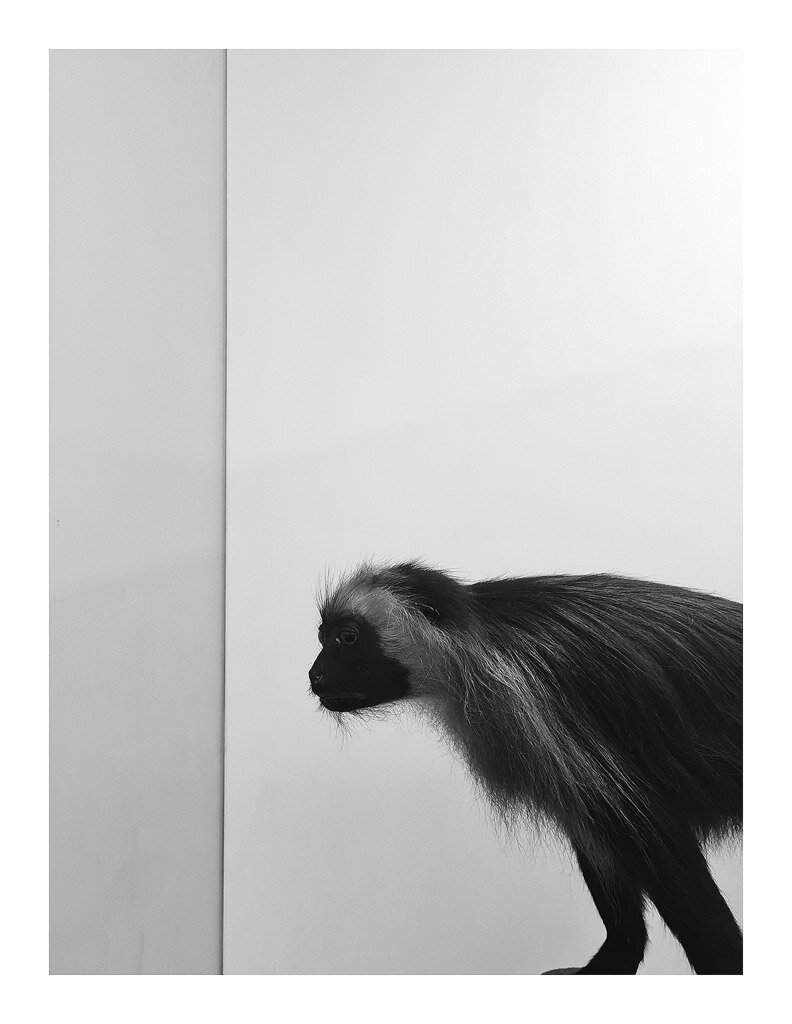
As many a frustrated phone user will tell you, it’s very, very hard to get good photos on the popular Singapore Night Zoo tour owing to the very low light. I cranked the GFX up to 6400iso and managed this shot, which reminds of a classical painting.

The old quarter in Hoi An was packed with tourists, but I loved the colours and mix of historic and kitschy new, especially all the plastic that seems so prevalent in Vietnam. The image on the far right is a personal favourite.

We finished up the trip with a few days in Honkers (Hong Kong). My wife and I spent some time in Hong Kong for our honeymoon many years ago, and it was interesting seeing how the city has changed. There’s still a lot of older buildings and traditional Hong Kong fare in Kowloon, but there’s also a lot of modernity and change as well.

Usually I take my camera with me everywhere, but I decided on our daytrip to Hong Kong Disneyland to leave it at home and just enjoy the moment with the kids. I’m glad I did. It would have been a nightmare figuring out what to do with the camera bag all day.

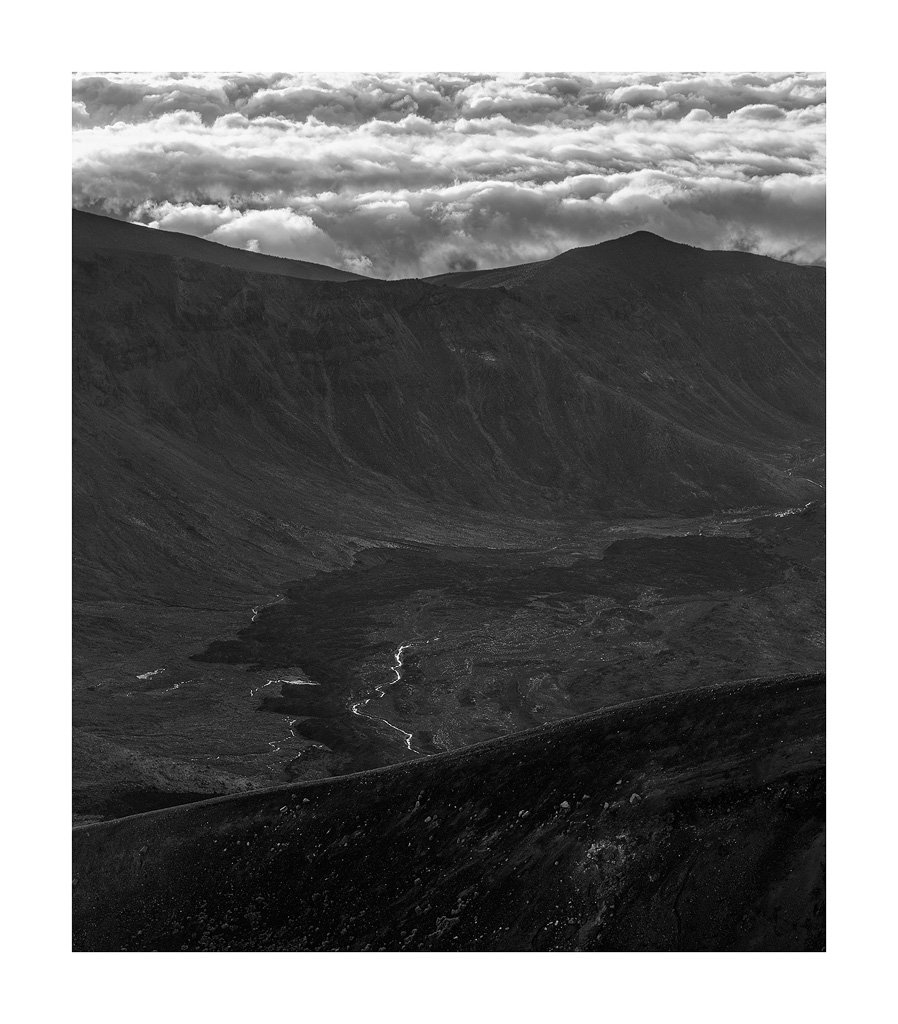
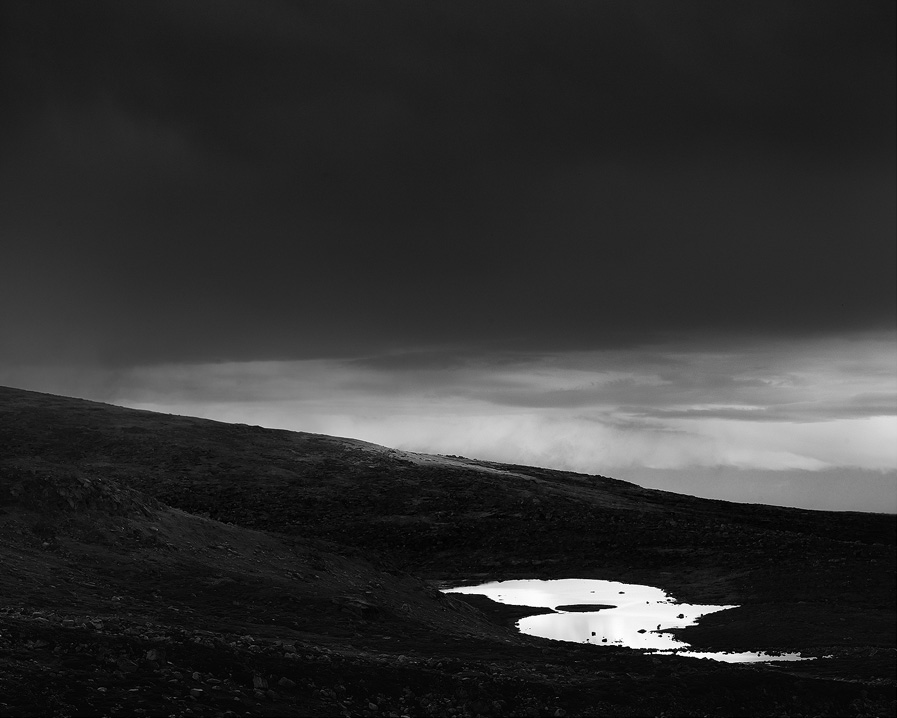
While everyone was busy shooting out over at the city at The Peak in Hong Kong, I turned my camera in the opposite direction. I suppose it was also something of a dynamic-range test.

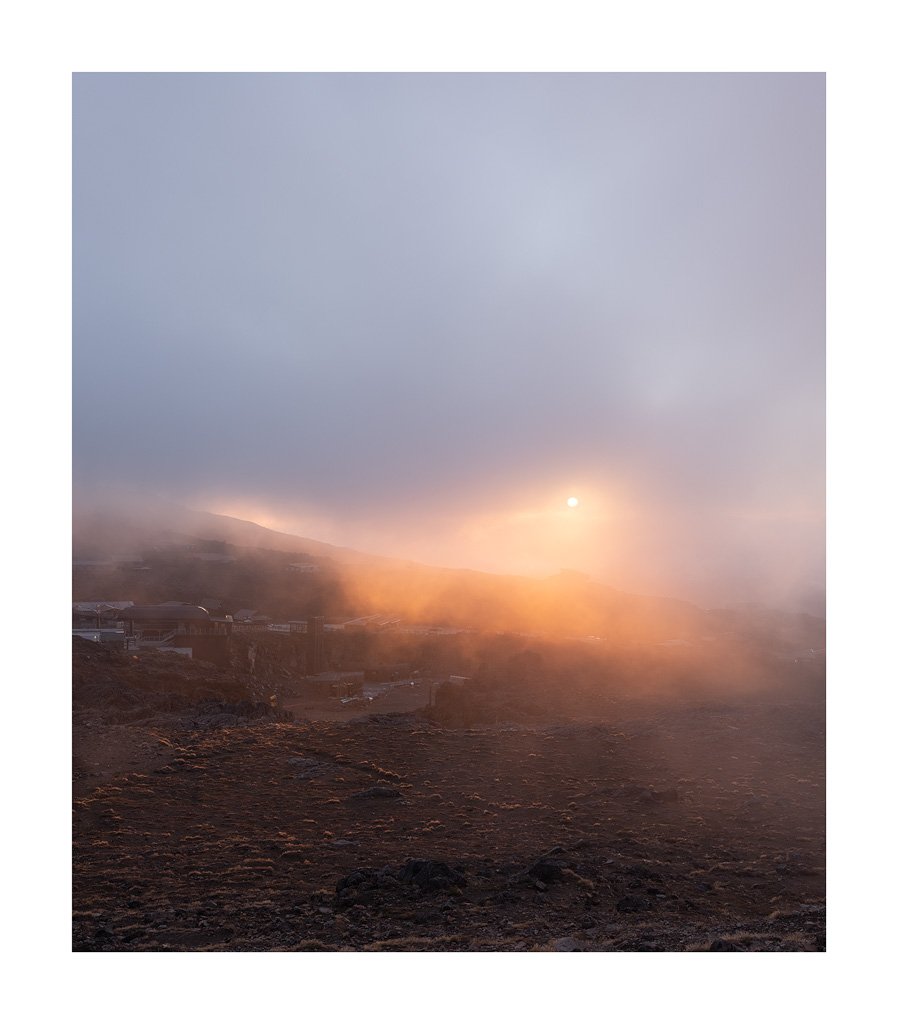
When our ship docked early in the morning at Hong Kong there was this lingering fog and a sole building lit up for NYE. It had a very Bladerunner-like feel to it.

I still love shooting with the Fuji GFX50R and my staple now of the 45-100mm F4. I actually ran a quick test in Camera RAW that determined my most used focal length on the last few trips I’ve done is actually 100mm, which in 35mm terms is around 80mm, so slightly telephoto. I suppose I do tend to zoom in to subjects to eliminate clutter and narrow down a composition, but it was an interesting discovery. In fact, 95% of my shots were at this focal length. The remaining 5% were almost exclusively shot at the other end, wide. I had been hoping this conclusion might have led me to a lighter prime lens in the GF lineup, but alas, there’s nothing light about tele primes, so the zoom will remain.

While I was in Hoi An in Vietnam I actually bumped into a photographer shooting with a Mamiya RB67 on a tripod, also with his family. Hats off to him. He must have an awfully patient wife, but it did get me thinking about pulling out the Mamiya again and giving it another go.

As for the title of this series, we had a tour guide in Vietnam (Phat) who called himself ‘Sticky Rice’. This made it easy for him to collect his group because he simply had to shout ‘Sticky rice!’, ‘Sticky rice!’ and everyone in the group would follow, sticking close, so to speak. He was so enthusiastic, so generous, particularly with my son (who can be a lot ), that If I remember nothing else, I’ll always remember Sticky Rice.

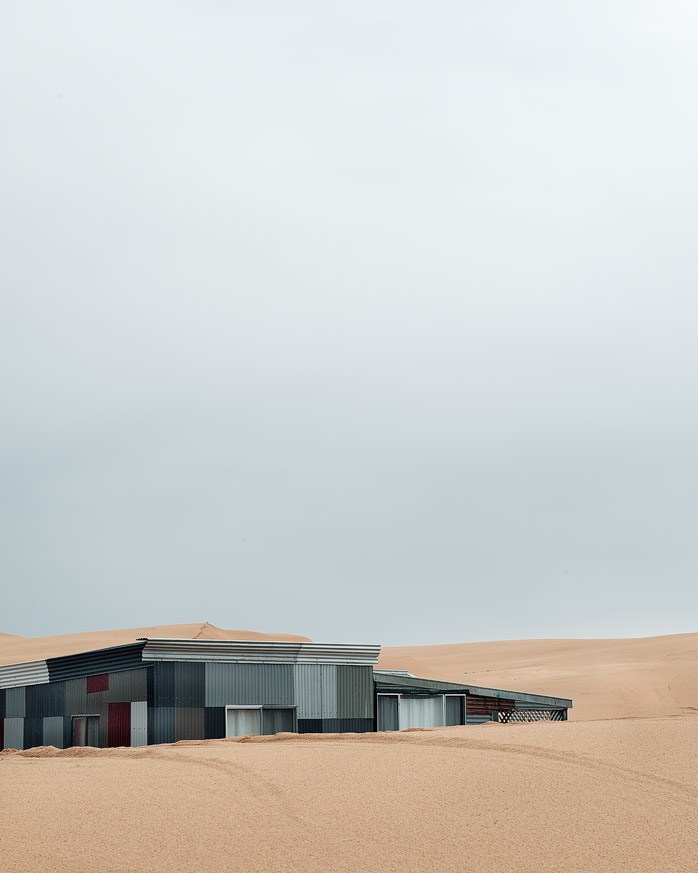
My favoruite image from the trip was taken just after sunrise looking out our Hong Kong hotel window over Kowloon. There was this soft light over the city, but it was hitting the material covering this building beatifully. It was kind of floating and shifting in this light and breeze, and looked so completely peaceful and organic in the otherwise squared and angular constraints of the city I had to take a shot or two. It still amazes me they use bamboo as scaffolding for skyscrapers like this, but sometimes natural really is best.

After all of it, I was thankful to touch down back home in Sydney, Australia. As to where my next photo excursion will be, I have no idea. I think I’m all travelled out for a while, so perhaps something closer to home. I would love to get to Karijini, even Iceland, so let’s see, but in a sense I think I also need some distance from photography for a while.

As always, thank you for reading my drivel. You can check out the full gallery of images here, or scroll down for the images that didn’t make it. There are a few. Cheers.

Skiing At Charlotte's Pass With The Fuji GFX50R

It’s a bit of a family tradition on my wife’s side of the family to journey to Charlotte’s Pass every year. Located in the alpine region of New South Wales, Charlotte’s Pass is Australia’s highest ski resort, a small village that is snowbound during winter. Finally, with COVID well in the rear-view now, we headed down to check it out.

A ICM image of snow drifts coming through looking over the valley towards Australia’s highest ‘mountain’, Mt Kosciusko. I like the painterly quality here and sense of movement.

I knew from the outset this would be a challenging trip photographically. The village of Charlotte’s Pass is very small, every building a muted shade of brown, green or grey, with not much colour to be found. But there’s also fun in the challenge, and once again, light hunting became my go-to.

Many ski resorts in Australia closed early this season because of a lack of snow (a lot of people are amazed we do, in fact, have ski resorts at all), but we were lucky to receive a good dumping of white stuff before we arrived, which lasted out the week.

Above are a series of images of trail markers used to show where obstacles lie on ski runs. I became a bit obsessed with the way they contrasted with the blanketed snow around them. They became a fixture of my more minimal images.

Likewise, I had hoped to get some images on the way to the village via oversnow transport. However, it was sleeting/windy and the cat itself was moving faster than I had anticipated. Still, I took this rapid-fire series of shots below hoping to get the right amount of movement and really emphasize the conditions. You can see this creek became increasingly clearer as we got closer, but I prefer the original image with movement and blur.

We stayed at TarGanGil Lodge in Charlotte’s Pass. I’d highly recommend it, not only because it’s the closest lodge to the charlift, but the food was nothing short of amazing. And I’m a pretty harsh critic. The kids also had a blast with the lodge guests and the fact you never really had to queue to get on a chairlift or T-bar, as Charlotte’s only allows a fixed number of visitors at any one time.

The two images below were taken in our room at the lodge. It had the most beautiful morning and afternoon light. I’m sure most Australians my age are familiar with the blanket on the left. They were a permanent fixture of every grandmother’s house in the seventies and eighties, horribly scratchy but always warm. They also remind me of childhood ski trips, of escapism. The way the light cut across the quilt was perfection—or at least to me.

This image was taken at the ski-tube trerminal at Perisher Valley. There is, and always has been, something kitsch about ski resorts in Australia. They feel like a time capsule of sorts, perpetually stuck in the past. I thought the colours and poster here perfectlly summed that up.

As always, I found myself smiling looking over the RAW files out of the GFX50R. I’ve had it a long time now and it has never disappointed. It’s that bridge between film and digital I’ve always been looking for. It simply works. One of the images I’ve posted was actually taken with my old Samsung S20 and upsized in Photoshop using Super Enhance, as I couldn’t let it pass.

Next year is shaping up to be very interesting photographically. I’m looking to knock off two of my bucket list destinations: Iceland and Karijini National Park, as well as keep my ICM series of Sydney going. I’ll also be working on creating a print shop for people to purchase my work, as I believe so many images here would make excellent wall art, especially the more minimally inclined.

All in all, it was a successful trip, though I’m not sure my body agrees. Skiing doesn’t seem as easy these days. Head here for the full gallery, or check out some of shots that didn’t make it below.

Ghostland: New Zealand's North Island With The Fuji GFX50R

Three years ago my friend and I planned a trip to do the Tongariro Crossing on New Zealand’s North Island. Often hailed as one of the best day walks in the world, this had been on my bucket list for a long time. I’d seen photos of the Emerald lakes and ‘Mt Doom’, wanted nothing more than to do a bit of hiking and capture some creative images of this unique environ.

I’ve had this image of Mount Ngauruhoe in my mind’s eye for a long time. It was nice to finally tick it off on the Tongariro Crossing.

We were packing, getting ready to go and… COVID. Right before we were about to leave, the world went into lockdown. So it is we finally got to make the trip, cutting it down to just the North Island for a span of a week, moving from the Tongariro National Park to Napier and then down to Wellington and Cape Palliser.

I’ve titled this series of images ‘Ghostland’. Walking around New Zealand I was struck by the prevalence of vaping. You’d be walking along a city street and these puffs of vape would cloud out into the sky from a car window or a walker-by. ‘It’s like a land of ghosts’, I thought to myself. This is something that became true in more ways than one as I both took photos and visited these locations I’d so longed for in my head.

The moonlike landscape of the Tongariro Crossing in New Zealand’s North Island. We couldn’t have asked for better weather.

Mead’s Wall via Whakapapa Village.

This also marks the first time I see a real narrative or theme in my images. There’s a sense of isolation in them, of an alien world, of the ‘other’. New Zealand is the land of the long white cloud, and it’s this constant shifting cloud in the sky, the moving mists and waters, that remind of me of my birthplace.

But there are also ghosts of a symbolic kind at work, of ancestors and broken ties between the natural and urban world, on the effects of climate change and the pandemic on the country. We drove through parts of New Zealand that were only weeks prior ravaged by flooding and landslides, homes upturned and rail lines twisted as if chicken wire.

The Emerald Lakes on the Tongariro Crossing. It’s not the image I had in mind, but I’m happy with it nonetheless.

The focal point of this trip was the Tongariro National Park, located a couple of hours from Auckland and about as picturesque a place as you could imagine. The peaks of Mt Ruapehu and co were obscured in cloud when we arrived and remained that way for our three days in the park, finally showing themselves the morning we departed.

We stayed at Tongariro Discovery Lodge. I’d originally chosen the Discovery Lodge as they offered the first shuttle of the day to the crossing, which allows for you to walk as the sun’s coming up and, more importantly, beat the crowds. The accommodation itself was great, the staff friendly—couldn’t have asked for more.

The same goes for the day of the crossing. We really got absolutely ideal conditions for the Tongariro Crossing itself, with temperate weather, low winds and little cloud. Given the next day was a complete wash-out of driving rain and wind, I’m lucky we opted for the day we did.

Hiking up in twilight, with the moon rising, was the perfect way to do the crossing.

I like negative space, apparently, and like most areas of my photography in recent years, I’ve come to embrace it.

The walk really lives up to its reputation. You start off in scrubby lowland and make your way past the twin peaks of Mt. Tongariro and Mt. Ngauruhoe. Starting in darkness meant the landscape was slowly revealed as we moved along, the moon setting as we made our way up the ridge towards the topmost point of the crossing looking down over the famous Emerald Lakes.

We reached this point at sunrise. The clouds were inverted and the lakes gleaming—It was quite the sight, though I did struggle finding any kind of meaningful composition. In fact, it wasn’t the lakes that ended up being the highlight but the barren, alien landscape before and after. We actually came up with this fictional character while walking we named ‘volcano man’ who creeps out from under the cover of darkness to snatch away stray hikers. Sadly, I don’t think it’s going to be a Hollywood blockbuster anytime soon.

After a dicey descent we dubbed ‘the slide’, we made it across to Blue Lake, which actually reminded me a lot the Blue Lake of the same name on the Main Range walk in Kosciusko National Park we did a year ago. We had lunch here and I was pretty taken by the absolute silence of the place. It was so calm—just the odd bit of breeze moving across the lake’s surface.

What follows from here is the long, long, long descent to the end of the crossing. I knew this was coming, but it did seem rather never-ending. It was a strange sensation descending slowly through the cloud back down to earth, so to speak.

Snow-making machines at Whakapapa Ski Resort.

In Tongariro we also spent some time heading up to Mead’s Wall via the Whakapapa ski resort. I believe this was one of the filming locations for Lord of the Rings. The ski resort was completely empty. It was so eerie seeing all this new equipment, this entire village and yet no one around. There were no cars, no nothing. This was another ghost-town moment, echoed by the fact so many restaurants, cafes and shops I’d noted down in the original itinerary hadn’t survived COVID. Even the mighty Chateau Tongariro has shut up shop, now bordered up and inaccessible.

What we did get up there was this spectacular sunset with the mist sweeping past us. We actually returned the day after the crossing when it was raining. You’ll notice a few shots of these snow canons used by the resort for snowmaking. They were all lined up in places and looking so alien and abstract I had to shoot them. When the rain became too heavy, I’d shoot through the windscreen once more channeling Todd Hido. As I mentioned, it doesn’t matter what the weather is, photos can be made.

Above are images from a nearby caravan park we drove through. I love these images because they incorporate so many quintessentially New Zealand elements, from the colored clothes pegs to the hills in the background, the long clouds, even the color of the grass.

From Tongariro we headed across to Napier. This coastal city is big on art deco. You might say it’s Napier’s ‘thing’. There were two cruise ships in when we arrived, which created a nice buzz in town. Until recently the flooding and general devastation had put a stop to tourism, so I’m sure the locals were excited to see things slowly getting back to normal.

We had a fantastic meal at Craggy Range Restaurant and journeyed out a bit for New Zealand’s best chocolate éclair (read: pretty much the size of my head) at Ohakune. We had intended to walk the coast to Cape Kidnappers, famous for its garnet colony, but couldn’t get the timing with the tides right. It wasn’t to be.

Napier, New Zealand. It pays to be ready for moments like this. It took some scrambling on the sidewalk, but I managed to place myself just in time to get this ‘cloud flag’ image of one of Napier’s many art deco buildings.

An abstract of a popular pagoda-type installation near the Napier shoreline. I only took a few frames, but I like the way the angles and shadows have worked in balance in this one.

We arrived in Wellington the following day and had another wonderful meal, this time at Rita. We both remarked how much the city of Wellington at large reminded us of San Francisco. The area we were staying in, Breaker Bay, was beautiful and just far enough from the city itself to feel like you were somewhere else entirely. I enjoyed a productive morning getting up for sunrise and copping one of New Zealand’s classic eye-poppers lighting up the sky, as seen below. I think this was the only time I used the tripod on the entire trip.

The day before we were due to leave we made the one-and-a-half hour (quite scenic) drive to Cape Palliser from Wellington. We had obligations back in Wellington, so we were never going to have long at the Cape per se. We jumped out of the car, I snapped a few frames and we made our way up the 258-odd steps to the top and back in the space of ten minutes. After the Tongariro Crossing and our crisscrossing of hilly Te Mata Peak back in Hastings, it didn’t seem that taxing. I had hoped for some interesting compositions of the famous tractors on the beach at Ngawi, but walking around them it wasn’t at all what I expected. I was a little disheartened on the way back we’d made this big drive for essentially nothing photographic, but going through the shots at home, one stood out…

I only took a few frames of the Cape Palliser lighthouse, but I like the way the cloud sits low and to the left here. Together with the staircase, it adds a nice sense of scale. It might feel criminal to convert this to black and white given the lighthouse’s patent white-and-red striping, but sometimes you have to go against what might be considered traditionally correct.

Once again, working with the Fuji GFX50R was wonderful. I was watching a video by Kyle McDougall recently where he talked about his decision to go with the GFX50R, and so much of it mirrored my own choice. I think it’s that perfect film-to-digital bridge. As Kyle shows, you can get very, very close results between the two, but for me it’s the ease of use, the deep editing latitude in the files and that medium-format (kind of) X-factor that makes even the mundane scenes I love so much come to life.

I used the GF45-100mm F4L OIS exclusively for this trip. It covers the exact focal range I need, from wide to slightly tele. Do I wish it was more compact? Sure. In fact, I’ve been eyeing off the 50mm pancake lens for a trip later this year where weight might be a concern, so we shall see.

These are the shots I seek out now. I’m looking for quirks of light, little pockets of it that raise questions. I can’t recall whether the shadow was a friend or a passer-by, and I like the mystery this adds.

Another example of how my photography has changed. This imported van, a common sight in New Zealand with that particular tint, was obscured by the bushes, but the camera’s gaze is voyeuristic too. You wonder what is past the van, what are they doing? The unseen.

When I arrived home, I wasn’t sure I had ‘gold’, so to speak, with these images. But once I started editing, I started to appreciate the darker side of some of these scenes, leaning into the low light or extreme minimalism.

I started to realize I’ve come a long way. Once upon a time, I would have used a tripod for every shot, matched levels perfectly in Photoshop to ensure nothing was too dark or underexposed. Now I process for mood rather than what is technically correct. I’m no longer scared of odd lighting conditions. In fact, I actively seek them out.

I also seek out compositions and subjects I know will not appeal to the masses. That might be rain crossing a car window or a blurry hill, but they speak to me. In doing so, I know they will speak to others, that my photography will find a place. Not everyone has to enjoy or ‘get’ it.

There is also duality in some of these images, like those pictured above of the two trees outside our accommodation near Hastings. This is an aspect of my photography I’m going to continue to push in coming trips.

Looking through these images, I’m pleased they raise questions. I want them to make people think and scratch their heads a little. There are photos here shot simply for the sake of composition, sure, but I hope you might see the deeper narrative at play.

Enough of this arty jibber-jabber then. Enjoy the photos. You can find the full gallery here or scroll down for the shots that didn’t make it.

The Continuing Joy Of Disposable Cameras

Generally, when I go away on trips, I like to take a disposable camera or two. I’ve had a couple in my bag for a few years now, including your usual Kodak Funsaver, a black-and-white Ilford HP5 disposable and a Lomography LomoChrome Purple. I pull them out when I’m bored or maybe see something of interest where I can’t get to my main camera, the Fuji GFX50R.

A image taken with LomoChrome Purple of a glacial lake on the Main Range Track in NSW, Australia.

This is the National Museum of Australia in Canberra I confess I had no idea about until I booked this trip. The architecture is wild, a real photographer’s wonderland.

I’ve spoken about why I like disposables so much before. They are photography distilled down into its simplest form: compose and click. Maybe it’s because I’m a child of the ’80s, but I suppose there’s a certain sense of nostalgia there too. In fact, when I got this latest batch of images back from the film lab, my daughter’s first reaction was, ‘Wow, Dad, they look so retro!’. That’s right, daughter of mine, and for good reason. IG filters need not apply.

But it’s the fun factor of these things that make them so worthwhile. There’s an element of chaos in the way light interacts with the cheap lens and film, the often wonderfully imperfect results you get and that finger you forgot to tuck away in the corner of the frame. The results may not be sharp or technically precise, but I’ve been slowly moving away from sharpness – something I confess became a kind of obsession early on in my photography journey (Marc Adamus sharpening technique, anyone?).

Kata-Tjuta, Northern Territory, Australia

I’ve also been trying to get my daughter, now ten, into photography and these disposables are the perfect gateway drug. Why not a Fuji Instax like every other hip teenager has? Because, like the ubiquitous smartphone, it’s still (almost) instant gratification. With disposables you don’t know what you’re getting until your images come back from the lab, and I think this adds a certain element of suspense and surprise into photography that’s missing in the modern world.

It was a great bonding exercise heading out with our disposables and coming up with compositions and interesting shots together. In fact, some of the shots presented here I really, really like – maybe more so than many images taken with my medium-format digital. There’s an organic, muted quality to them.

Blue Lake on the Tongariro Crossing in New Zealand, though here presented in black and white with an Ilford HP5 disposable camera.

And here’s another view of the same lake, this time taken with a nondescript colour disposable.

It’s been interesting, too, to see how each of these films have created such wild and varying results. Many shots I thought would work perfectly fell flat with Lomography LomoChrome Purple, and many I didn’t think would work at all were great. I made a real effort to use the flash more creatively. That also played into it.

There are plenty of great family photos I won’t share here. The reflect memories and moments in time far better than any smartphone could. I love digital, but I don’t think any film photographer, no matter what they use, would argue with that.

Above is an amusing situation where my friend and I took a photo of each other with different disposables while hiking the Main Range Track in Kosicusko National Park in NSW, Australia. You can really see the LomoChrome Purple at work on the right.

So, if you’re heading out, why not take a disposable with you if for nothing other than B-roll? They weigh nothing, take up little space but can provide joy in the most abstract of ways. I hope you enjoy the images. More below.

Road Trip To Tumut: Regional NSW Landscape Photography With The Fuji GFX50R

Recently, we headed away on a family road trip through regional NSW to the snowy mountains town of Tumut in New South Wales (In truth I was on a hunt for cherry pie…). At first it seemed the extensive flooding would put a dampener on plans, but we ended up with all kinds of weather. As is typical for these family trips, sometimes photography has to take a back seat, but I did come away with some interesting images.

It’s always best to take the scenic route to a destination, even if it adds an hour or so. I’m not sure if we were too late or too early for canola season, but I actually like the way it turned this field into a gradient owing to the patchy light.

Once again I used the Fuji GFX50R medium-format camera and the GF45-100 f4 OIS lens, a combo that has been serving me well. I used the GFX earlier this year for two weddings, and apart from a bit of sluggish AF on occasion, it worked perfectly well. In fact, looking at the files side by side with my friend’s full-frame Sony, which was also used on the day, the GFX files had so much more character and depth to them.

This was also a good test for the ruggedness of the GFX. At one stage I had it out in torrential rain, through caves, rivers, hiking up a cliff… It’s nice to know it can stand up to that kind of treatment (abuse?).

The night comes in at Blowering Dam about 15 minutes drive from Tumut. The dam was actually spilling, which I’m told is fairly rare, but we’ve had extraordinary amounts of rain this year in NSW. I was drawn to the clouds here.

We really packed it into this trip. We hiked to the thermal pool at Yarangobilly Caves, a pleasant 28 degrees Celsius. My son (8) and I also made the walk up to Blowering Cliffs, the waterfall pumping after all the rain we’ve had. We had an amazing meal at Three Blue Ducks Nimbo Fork, where my son told the chef it was the best meal he’d ever had. We checked out Batlow and came away with apples the size of mini bowling balls. We walked, drove, ate… There’s so much to do in an area most people simply pass through on their way to the ski fields.

This is a lamp reflecting light on a bedroom wall at our Airbnb. I’ve spoken about how I’ve become obsessed with minimalism and light. I look for it everywhere, even in the least-obvious places. I like the way the light made the wall look almost 3D, as if something was pressing it out like fabric.

I’ve really started to establish a common theme in my work. I know what I’m looking for these days, which is usually a combination of light, visual interest or minimalism. I tend to mix this with interesting skies I see, but what I’m really looking for is something out of the ordinary, be it some link to Australian nostalgia, or an interesting play of light on a common subject. People often think I’m crazy when they see what I’m shooting, but I am doing so with purpose. I usually start off a trip like this is a nervous state until I take my first shot or keeper. Once I have a couple in the bag, I tend to relax. Once my bag is full, so to speak, I get lazy. So it goes.

I had a strange hankering for cherry pie—strange given I don’t actually like cherries. So, we drove through the town of Young, which is the cherry capital of Australia. I finally got my pie at Wilders Bakery and it did not disappoint.

Something else I’ve started to do in these towns is head out for a long, extended walk during the early morning or late afternoon. I had not considered how hilly the town of Tumut is, so it made for quite the workout. The GFX handled the wide dynamic range at this time extremely well. You can lift shadows from near pure darkness if needs be. It’s a great way to explore a town and more or less have it all to yourself.

Heading into 2023, I’m excited about some potential photo trips now COVID is waning. Already on the cards is a long-anticipated trip back to New Zealand, another to the deep ski fields of Australia, as well as a trip to the US and also Karijini, deep within Western Australia. Keep an eye on the blog for everything. You can see the full gallery from the Tumut road trip by clicking here.

From an early morning walk near the river in Tumut. I just love the way the light was working with this particular house.

We had to polish off the trip with a stop at the Long Track Pantry in Jugiong for a cheese toastie. I couldn’t resist this shot of the rooster, the jet trail and this lone bird.

Lake Amadeus | Aerial Landscape Photography With The Fuji GFX50R

While we were on our recent trip to Uluru, the Red Centre of Australia, I was lucky enough to try my hand at some aerial photography over Lake Amadeus, a large salt lake. This has been on my bucket list for a very long time. I’d seen the lake on Google Maps and noticed the unusual islands and patterns in the surface, but there didn’t seem to be much attention paid to it in terms of landscape photography.

It’s incredible to see the patterns and colour in the lake from the air. I was lucky that the weather provided perfect, dappled lighting.

Originally, I had intended to charter a helicopter, but I was told the doors could not be removed owing to the speed required over the lake. So, a plane it was thanks to Ayers Rock Scenic Flights (Fly Uluru), and I think that worked out much better.

On arrival to the airfield I told Ben & Tim, our pilots, what I was looking to do and they were happy to remove the rear seat in the plane and keep the rear door open in flight so I could shoot out unobstructed. I really cannot describe how incredible it is having the door open and the lake right there in front (or below, rather) you.

I think the guys were actually quite excited given generally they only fly over the lake briefly, plus this was something different for them as opposed to the usual routes over Uluru and Kata-Tjuta. I was able to ask to fly higher or lower, bank here, or check out something over there. It was like having your own RC plane.

Here a patch of sun lights up a small dune on our flight out of the lake. It really shows off the colour of the earth around the lake and Uluru in general.

This was my first time doing aerial photography, so I’d understandably researched quite a lot as to how to prepare. Given a previous experience in a helicopter looking through a viewfinder for half an hour, I was well aware of the motion-sickness issues before the flight. I took two tablets prior to flight and didn’t have an issue the whole hour. In fact, it was so smooth my son, who was in the co-pilot’s seat, managed to fall asleep, and this with the rear door open. Perhaps the pilot is to credit there. I had intended to use the rear screen on the camera, but worked out fast the glare made it hard, so viewfinder it was.

In terms of settings, I knew I’d need something like f8-f11 for good depth of field, and taking into account the Fuji GFX50R is medium format, I also knew a focal length around 50mm would work, which made the GF45-100mm F4 perfect, especially given it also has image stabilization. Given the vibration in the plane and my shaky hands, I opted for a foolproof 1/1000th speed, which meant ISO around 1000, though I backed this off to 640 ISO owing to the light about 10min into the flight. Set up like this, with a backup battery and spare card in my pocket, just in case, the only thing to do was lean over and concentrate on composition.

It’s amazing how from the air the landscape looks like an Indigenous artwork or dot painting. Clearly, the local Anangu people couldn’t fly way back when, but it’s interesting to see the resemblance.

At times the lake looks like a frozen, ice-swept tundra. The detail provided by the GFX really needs to be seen up close for best effect.

I think for many people they would look down on the lake and see only a barren wasteland frequented only by the odd wandering camel, but for me it was a goldmine of patterns, shapes and colours, compositions everywhere I could see. In the space of an hour, I took around 300 photos, of which I’m only sharing a few here, though they are all impressive. I’d happily print and frame any of them.

Processing was also a breeze. The files from the GFX50R are so rich in detail and dynamic range most files only needed a single curves adjustment layer in Photoshop for contrast adjustment. That was about the limit of it.

I call this one ‘The Best Boy’ because it looks to me like a dog running after a bone.

This particular part of the lake reminded me of a cuttlebone.

Once again, a big thanks to pilots Ben and Tim who made accommodations for me and this flight so enjoyable. If you’re in Uluru and looking for something special, definitely hit the team at Ayers Rock Scenic Flights up on their website by clicking here.

Scroll down for more images or check out the full gallery here.

‘The Scream’ - After the infamous painting, though to me it looks more like the flukeworm from the X-Files.

This one is titled ‘Flipper’ owing to the dolphin in the lower right.

Uluru & The Red Centre With The Fuji GFX50R

For a very, very long time I’ve been meaning to get out to Uluru, the red heart of Australia, for photography. Prior to this trip the closest I’d been to the Outback was Silverton, which any real Australian will tell you is not the real Outback at all.

Although I generally steer towards more abstract imagery these days, I couldn’t resist this famous view. It really is a sight to watch the Rock glow at sunset. This was from Uluru Lookout not far from Yulara.

The first thing that strikes you is the rich, ochre red colour of the earth. It’s quite remarkable and alien at the same time. The two big attractions are, of course, Uluru itself, or Ayers Rock, and Kata-Tjuta. Apart from the resort town of Yulara, where we were based… that’s about it out there unless you want to venture to Kings Canyon or further afield.

Rich in iron, the soil and colours around Kata-Tjuta, here at Walpa Gorge, are incredible and completely alien.

I also spent a while walking around our resort looking for shapes and colours, anything of interest. I was really drawn to this simple scene and it has become of my personal faves from the trip.

Apart from photography, I’d booked a bunch of tours for the family, and we spent a lot of time at the free activities offered by the resort (Sails In The Desert). The kids picked up a lot of information, as did I, and we found the resort a great place to be in general, with great food and facilities.

Unable to hire a car, owing to myself not realizing how damn busy the place gets, I had to work my photography around bus tours, which actually worked out well. What I hadn’t planned on was rain and cold, which is what we got the first day at Walpa Gorge, but it actually made for very abstract photos where I could blow out the sky and concentrate on the rock formations much like I did many years ago at the Remarkables on Kangaroo Island.

Closed for a few years now, you can still clearly see evidence of the walking trail to the top of Uluru on the rockface.

Throughout the trip I was conscious of the sacred areas of the Anangu people where photography is discouraged. This includes the whole back side of Uluru and the entire Valley of the Winds walk, which I did with my eight-year-old son later in the week. That said, there is no shortage of compositions, though I found I did have to look harder than I normally would to find something unique in a place that has been photographed perhaps millions of times.

After a few days of rain and cold, it was great to see the sun come out at Uluru. These days I pay much more attention to shadow, giving it equal importance. Here, the light cuts the frame into three distinct sections.

I love to find images that blend man-made with the natural world these days, whether they’re working for or against. This a very Aussie pairing.

As I do, I also spent some time wandering around the resort looking for interesting light and shapes, and these were actually among some of my favourites. I’ve also become increasingly interested in the relationship between man and nature, and Uluru is a perfect example of these two working at times both for and against one another.

Once again the GF50R made life very easy. I generally left it on Auto ISO and actually shot a wedding with the camera prior to this trip, which confirms it’s a camera that really can do it all. I only took one lens, the GF45-100mm F4, which is all I really needed, offering both a wide and slight tele when required. The files have come out rich and full of detail, most of which is sadly lost in web viewing.

I’ve been eyeing off this weathered tree in Walpa Gorge for years. It was great to finally tick this shot off my bucket list.

Uluru really changes depending on the time of day and lighting. Here you can see the sun is just starting to emerge.

This waterhole is a popular tourist site, but it’s also oddly meditative, as is most of Uluru.

If you are looking for something different, I highly recommend a trip out to the Northern Territory. Five days is about perfect to see everything, with flights running from most major cities daily. I was also lucky enough to do some aerial photography over Lake Amadeus while we were there. You can read all about that here.

For the full gallery of Uluru images, head here.

The sun almost setting on an Australian icon. But five minutes later…

…the sky had turned into this. It was a wonderful end to a eventful trip, even with kids.

Perfect One Day: Queensland With The Fuji GFX50R

Over the Xmas break we spent six weeks in Queensland bouncing between families we hadn’t seen in almost a year thanks to COVID and border closures. This series, ‘Perfect One Day’ is a play on the old Queensland adage of ‘Beautiful one day, perfect the next’. Indeed, Queensland typically offers up perfect, sunny weather and ideal holiday conditions, but not always. Nor is the landscape ‘perfect’. Once again I am looking for the beauty in everything, even the mundane and banal.

I am not sure what this machinery we found in the cane fields is, but I was quite obsessed with it and the afternoon light. I also like the moon above.

Thanks to the extended Sydney lockdown in 2021, I had hardly had a chance to use my camera, so I was very keen to get out and shoot as much as possible. I have found my style has changed. These days I am seeking light just as much as I am seeking subject. That includes hunting in golden hour, during the harsh light of midday and even night. I am looking for shadows and contrast, where I can underexpose images for the first time, perhaps use flash. This has come about from watching so many other photographers on YouTube during lockdown. I have felt I need to expand and grow.

This image of surfboards in front of a shop window was intended as a throwaway. I liked the light, but didn’t feel much else. However, after dropping the exposure in post and making it black and white, it became one of my favorites. More and more, I’m looking for both under- as much as over-exposure these days.

The cane fields around Jacob’s Well are a popular filming location and the source, for myself, of much visual interest. I also wanted to portray that essential coastal element so critical to Queensland life—the importance of water in both the landscape and as a part of recreation. When we reached the Sunshine Coast we were greeted with endless rain, but this too offered possibility in the greener hinterland towards Maleny. I have said it before, but adverse weather is always the best time to head out and typically the most exciting.

This Todd Hido take on a rainy landscape really worked out well. The painterly nature of the shot shows once again every shot does not have to be perfectly in focus or even sharp.

I have also found my processing has reduced a lot. This is helped along by the dynamic range and latitude in the files of the GFX50R. The tones coming from the camera also require little adjustment in post. I do run a preset in Adobe Camera RAW to give me something closer to a Kodak Portra look, which I love. It does wonderful things to the blues and reds of an image, particularly in the skies, but it is subtle. I think this way I am coming closer to getting that film experience where editing and processing isn’t taking up so much time. Even sharpening I’ve reduced by almost half.

I am loving both the latitude and tones coming from the GFX50R.

I am still yet to provide a detailed review of the Fuji GFX50R, but the more I see the results from it, the more I fall in love. In addition to the GF80 f1.7, which I use solely for portraits, I added the GF45-100 f4. It is neither cheap, nor light, but it provides the perfect range for what I shoot (about 35-80mm) and offers both IS and incredibly sharp images. The new GF35-70 was also very tempting in terms of weight, but I think overall the 45-100 was the best move. It’s all I ever need (famous last words, yes, yes).

A wonderful morning looking over the Glasshouse Mountains from Wild Horse Lookout. I find my processing for landscape images far more subdued in my old age, aiming to get the softer tones of film and even classic, traditional art instead of eye-bleeding contrast and saturation.

Adjusting to medium format has taken some time, but I’ve found the right balance now, generally shooting between f11 and f16 for depth of field, setting Auto ISO up to 3200 (a vast improvement over the Sigma) and keeping IS on unless I’m using a tripod (minimum shutter speed of 120th). Set  up like this, it really is ‘run and gun’ with little thought as to settings. The only real thing that needs any thought is whether to adjust exposure compensation.

A common question I am asked is whether the Sigma SD-H I formally used offered more detail. It’s a tough question and there is very little in it. Perhaps, yes, there is a tiny amount of micro detail the Sigma had, but Fuji has plenty of detail too. A bit of sharpening and it would be hard to tell the difference. The Sigma is a very different camera, though, and has its own look in terms of tonal separation. In terms of ease of use, the ability to ramp up ISO and the sheer dynamic range on offer, the GFX50R is a far more capable and friendly machine. Still, I hope Sigma persists and comes out with something amazing.

Even a simple subject like the bottom of a swimming pool can become a wealth of geometric and tonal gold if examined.

With Australia opening up a little, I have a few trips planned this year. I want to make up for lost time and really make some great images, so stay tuned. There’s plenty more to come in 2022. I’ll leave you with some shots that did not make the cut, so to speak, below. If you’d like to check out the full gallery, you can head here.

Snow In Katoomba With The Fuji GFX50R

I’ve been up to the Blue Mountains here in New South Wales countless times. My mother lived there for almost fifteen years, but I had never, until now, been there while it was snowing. When I heard a rare cold blast was due that almost guaranteed snow, I had to check it out.

Snow is a rare thing in the Blue Mountains, but this particular day it didn’t seem to want to stop.

Snow is a rare thing in the Blue Mountains, but this particular day it didn’t seem to want to stop.

As I was driving up from my home in Sydney’s west I kept an eye on outside temp. It was five degrees, then four, three… rain turned to sleet and finally snow. To say I was excited was an understatement. I arrived in Katoomba in such a frenzied state I almost didn’t know what to shoot first. Having a new camera didn’t help.

It was snowing heavily when I arrived, casting what’s usually a very familiar landscape into something foreign and magical.

It was snowing heavily when I arrived, casting what’s usually a very familiar landscape into something foreign and magical.

I have long dreamed to get a shot of the Three Sisters while it’s snowing, but such were the conditions the valley was a complete whiteout. I thought I’d wander the streets instead looking for interesting and abstract compositions of the mundane and banal, something which has become a focus of mine these last few years.

_DSF4950-copy.png

Yes, I sold all my gear, including my Sigma SD-H and Fuji X-Pro2, to buy the Fuji GFX50R, a camera I’ve been eyeing off for a while. While I am excited to see what Sigma comes up with next, I don’t see it arriving anytime soon, and the GFX50R suits all my needs. I like the idea of ‘one camera to rule them all’. I’m a minimalist at heart.

I’ll write up a more comprehensive review of the GFX50R soon, but I have found it a real joy to use. I had it out all day here and it never missed a beat. It was wet, caked in snow and still soldiered on. I shot with my sole lens at the moment, the GF 80mm f1.7, which I’ll also get around to reviewing, suffice to say it’s very, very sharp.

I love retro signs like this. Originally I did this whole set in colour, but found it was more suited to black and white in the end.

I love retro signs like this. Originally I did this whole set in colour, but found it was more suited to black and white in the end.

Having never really shot in snow, I worked out two things fast: You need a fairly high shutter speed to capture the falling snow, and two, a bit of exposure comp does wonders. Mostly I shot somewhere between 250th-500th of a second, which I found was enough to ‘freeze’ the snowflakes in most shots.

This reminds me of something out of a Wes Anderson film, more so in colour.

This reminds me of something out of a Wes Anderson film, more so in colour.

It was a fun day. I swung by Eight Things in Katoomba for some excellent nasi goreng, grabbed some specialty chocolate from the Carrington deli and checked out the exhibition at the art center. Finally, after around six hours, the snow started to abate and return to sleet. I was also very excited by the GFX50R. I’ve had a month or two with it now and look forward to showing you what it can do. Check out the full set of images below.

_DSF5058-copy.png

Taking The Long Way To The Main Range Track, Kosciusko National Park

Earlier this year myself and my friend headed the long way down to Jindabyne via Tumut to tackle the Main Range Track. The Main Range is a 21km-odd track within the Kosciusko National Park taking in everything from glacial lakes to dramatic alpine tors. It had been a while since I had travelled, or hiked, since COVID, so expectations were high.

We found this abandoned service station in Marulan, a former highway town. I love places like this which sum up the Australian roadtrip experience.

We found this abandoned service station in Marulan, a former highway town. I love places like this which sum up the Australian roadtrip experience.

We headed off the main highway through some of the smaller towns the highway has forgot, such as Marulan. As always, I’m a sucker for anything abandoned and old, retro and interesting. I was also quite fond of the mix between old and new in Goulburn. I still enjoy this type of photography, seeking out the mundane. When I’m looking for things to photograph, I don’t consider the subject at all, but instead look at things only in terms of shape, line and colour. I have found it helps if whatever I’m shooting is also in direct sunlight.

I became obsessed with signage during this trip, trying to lend a bit of space to my compositions far more than I normally would and ‘group’ elements together.

I became obsessed with signage during this trip, trying to lend a bit of space to my compositions far more than I normally would and ‘group’ elements together.

Here is another example. Once I would have taken out the power lines and additional light in the bottom right, but I think they all work together, almost like a compositional jigsaw puzzle.

Here is another example. Once I would have taken out the power lines and additional light in the bottom right, but I think they all work together, almost like a compositional jigsaw puzzle.

Once we reached Jindabyne, to be met with double rainbow over the lake, the forecast was not good for our hike the following morning—torrential rain and thunderstorms. Alas, we woke and the conditions were near perfect heading up to Charlotte’s Pass.

After a close call crossing the river, we headed up to some of the best light I’ve seen in quite a while. My friend and I had been meant to hike New Zealand’s Tongariro Crossing last year, so this hike was to essentially make up for that. I must say, the Main Range Track/Walk was far more scenic than I thought it would be, especially once you got up to Blue Lake and onwards.

The early morning light was fantastic on the Main Range, the cloud sweeping in and out of the landscape.

The early morning light was fantastic on the Main Range, the cloud sweeping in and out of the landscape.

I struggled with this image for a long time until I realised a low-key black-and-white look would suit it well.

I struggled with this image for a long time until I realised a low-key black-and-white look would suit it well.

Apparently Blue Lake is 28 metres deep and boasts the freshest water in mainland Australia due to its low salt content. We took the detour down to the water’s edge. It was certainly clear and inviting, but one finger dip into the water told me I’d come out an iceblock if I ventured in for a swim.

Blue Lake had exactly the kind of scenery I was after. The light coming from the right was perfection—It felt like nature’s own softbox. As for swimming, though…

Blue Lake had exactly the kind of scenery I was after. The light coming from the right was perfection—It felt like nature’s own softbox. As for swimming, though…

The weather changed quite dramatically the higher we got. We moved into the clouds and the views vanished along with visibility. This made for some of my favourite shots. When shooting traditional landscapes like this, I prefer adverse weather, silently cursing whenever there’s a blue sky. That’s quite the opposite from what I look for with my ‘mundane’ photos, so it’s nice to have both worlds.

This is one of my favourite images from the trip. There is a danger when you open Levels for an image like this and see how dark it is to bring up the whites, but I think it works far better remaining dark and moody. It adds mystery and is far more …

This is one of my favourite images from the trip. There is a danger when you open Levels for an image like this and see how dark it is to bring up the whites, but I think it works far better remaining dark and moody. It adds mystery and is far more faithful to the actual conditions.

We hit Mount Kosciusko mid-morning and from there the track improves. There were quite few people heading up the summit, including a few in wheelchairs and even a guy in thongs. It’s not exactly a killer climb. From Australia’s highest toilets and it’s then a looooooong fire trail back to Charlotte’s Pass. At times it seems never-ending, but we made it and headed back to Jindabyne Brewery for a well-deserved drink.

Finally, we wrapped our trip up at Bermagui on NSW’s South Coast. I had seen this spot below on a few social media feeds and had to check it out. At first we could not figure out how to get down to the rock shelf, but perseverance over the headland got it done. It ended up being far easier than we expected. It’s been a very long time since I shot a traditional seascape like this. I got a bit frustrated with the processing. It’s been a while!

This is spot is a photographer’s favourite on the NSW South Coast. As far as seascapes go, it would be hard to find better. In fact, the whole coast around Bermagui is full of dramatic rock formations like this.

This is spot is a photographer’s favourite on the NSW South Coast. As far as seascapes go, it would be hard to find better. In fact, the whole coast around Bermagui is full of dramatic rock formations like this.

Yet again I used the Sigma SD-H for this trip and the Sigma 50mm f1.4 ART for most of the shots, pulling out the 24mm f1.4  on occasion when I needed a wider angle. I was really hoping to see Sigma’s full-frame Foveon camera this year, but I do respect Sigma for holding back on a product they are not completely behind. I have been eyeing off the GFX50R again, so we’ll see if I make the jump.

If you can make it out to the Main Range Track, Kosciusko or any of the smaller towns listed, it’s well worth it. Australia needs the tourism dollar more than ever. Head here to check out the full gallery of images from the trip.

A Day At The Museum: Phone Photography At The Australian Museum

Recently we held our own family ‘Amazing Race’ in and around Sydney CBD. One of the stops was the incredible Australian Museum. It has to be said, if you have kids and you live in Sydney, you need to check it out. Fresh off a recent renovation, it is a true treasure trove of all kinds of natural history and interesting objects and artefacts. Kids love it, and it’s free. Walking around the museum, I started to see photo compositions. I thought, ‘Damn, I don’t have a camera on me!’. Alas, we modern folk always have a camera on us…

201210228_121020-copy.jpg

So, I pulled out my Samsung S20 and started shooting. As we were in a slight rush that day, I actually went back myself a week later to spend a bit more time walking around. It really is a photographic goldmine. It’s almost cheating when you go to a museum or theatre, where the lighting is already set up to be dramatic and interesting. It then becomes to the job of the photographer to look past that into light and shadow, and composition, to draw out visual interest.

20210309_114204-copy.jpg

I decided to make the series black and white to focus on that contrast between light and shadow, and to provide some consistency between the images. This is something I’m trying to work a lot into my photography at the moment—a ‘brand’ of sorts where it becomes clear that these images belong together, or these follow a theme… Just a way to help the viewer connect the dots. It’s probably the hardest thing in photography, to find your voice and signature style. Obviously, I’m still trying.

20210309_110236-copy.jpg

I had fun, the kids had fun, and it proves at the end of the day you do not require a Hassy or Phase, even a ‘real’ camera to take images. Could I blow these up to three-metre prints? Perhaps not, but smaller prints? Sure. Perhaps I will.

20210309_110950-copy.jpg

You can see the full series below. Check out the Australian Museum website here.

Mamiya RB67: The Continuing Joy Of Medium Format Film

It’s been a year or two since I posted about film photography. I usually pull the Mamiya RB67 out once a year to take new portraits of the kids and then tell myself ‘Never again!’ given how hard the actual process is. I should point out this is because of my kids, not the camera. It’s very hard in this digital age for kids to stand still and actually wait for a photo to be taken. When I do put in the effort, however, I am almost always pleased with the results.

5093-01.jpg

I have changed my process a little. I still shoot Portra 400 because I find it’s the perfect middle ground that offers lots of latitude with dynamic range and beautiful skin tones. I try not to shoot below f5.6. Anything lower and focussing becomes difficult. I know there are focussing screens and so on, but I find f5.6 provides the right amount of bokeh and depth without compromising both shutter speed and focus. I also have a checklist on my phone I run through to make sure the back is in the right orientation, the shutter lock is off, lever cocked, etc. It just helps make sure I don’t make any mistakes before hitting that shutter button and burning away a couple of bucks. I always use a tripod, even if it is inconvenient. All of this has combined to improve my keeper rate.

In this shot, you can see my focus was off just slightly because my daughter moved before I hit the shutter button. Is it a poorer photo for it? I don’t think so. I would argue only a fellow photographer would notice.

In this shot, you can see my focus was off just slightly because my daughter moved before I hit the shutter button. Is it a poorer photo for it? I don’t think so. I would argue only a fellow photographer would notice.

It might sound a bit crazy, but I no longer meter for my shots. I’ve shot with the Mamiya enough to know what shutter speed will work for what kind of light. Outside, it’s usually a choice between 1/125 or 1/250 if I’m trying to overexpose and shoot at 200 ISO. I will err on the side of overexposure rather than under with Portra. Given that, shutter speed and orientation are really the only two choices I make before lining up a composition.

5091-05.jpg

I’ve also become very conscious of light. When I first shot film I disregarded lighting conditions entirely thinking the dynamic range of Portra would cover it, but like any kind of photography, light is king. Now I actively seek out interesting light and will often put the camera way if I do not feel a shot one-hundred percent. This is slowing down and considering your shots—something many talk about when discussing film photography, a lot of which has carried over to my digital work.

5090-02.jpg

While it can be cumbersome and far more effort is required, these film photos are far more special to me than photos of the kids I’ve taken with my digital cameras. I still see that hard-to-define quality in them you simply don’t get with anything else. I’ve been looking into large format (clearly a sucker for punishment), so we shall see where that goes.

Over the years my daughter has become somewhat adept at posing. As soon as the Mamiya is out, she knows what to do, even if she preferred I hurry it up…

Over the years my daughter has become somewhat adept at posing. As soon as the Mamiya is out, she knows what to do, even if she preferred I hurry it up…

Something else that is worth mention is to consider who is scanning and processing your images. I experimented with different labs but eventually came back to Atkins even though they are a touch more expensive. Find a lab you connect with who delivers consistent colors and results.

5088-09.jpg

Have I considered another medium-format camera? Sure! But I always use the Mamiya and can’t bring myself to get anything else. I love the fact it’s all manual, doesn’t require batteries and is built to last. I know there are sexier cameras out there (looking at you, Hassy) but the Mamiya is enough for me. As they say, if it ain’t broke…

5087-03.jpg

Canola Season In Regional NSW With The Sigma SD-H

Well, who could have predicted what would become of 2020. Certainly not me. I had a big New Zealand trip planned in April, lots of photographic ideas… and then coronavirus. Everything, for everyone, changed, but like all of us I’ve tried to make the best of it. So it was I headed out with the family for a roadtrip to regional NSW right through canola country. Funnily enough, I had no idea it was canola season. It was simply a happy coincidence.

Having never seen canola before, I was amazed at how rich and vibrant the colour was. If I was travelling by myself, I probably would have been pulling over every five-hundred metres.

Having never seen canola before, I was amazed at how rich and vibrant the colour was. If I was travelling by myself, I probably would have been pulling over every five-hundred metres.

We started with an overnight stay in Bathurst. I headed out for an early morning walk with my Sigma SD-H and 50mm f1.4 ART. There is so much interest in Bathurst simply walking around the streets. I find that goes for all country towns in Australia.

I think I’ve come to a good place with the Sigma. Ninety-perfect of my shots are taken with the 50mm, though I do pull out the 24mm from time to time for a wider angle (keeping in mind the 1.3x crop factor). It turns out I’m always looking for a little more reach, however, so ideally the 85mm range is probably a better fit for me.

I was saddened to hear Sigma would not be releasing their full-frame Foveon camera this year, but I applaud the company for holding a product back instead of releasing something they weren’t willing to stand by 100%. I’m still keen to see what comes of it next year, or maybe the year after, though I have been eyeing off a Fuji GFX-50R. Stay tuned.

I had my wife pull over so I could shoot this out the car window. There were a group of people out of frame who must have thought I was completely mad, but this is my perfect kind of image these days. Read into it what you will.

I had my wife pull over so I could shoot this out the car window. There were a group of people out of frame who must have thought I was completely mad, but this is my perfect kind of image these days. Read into it what you will.

From Bathurst we travelled to Wagga Wagga through Blayney, Cowra, Cootamundra, Junee and many towns that were little more than a general store and a pub. I love driving through the streets of these towns and looking for comps. What am I looking for? Anything with visual interest, whether that be lines, form, colour… Something that stands out, or has character. Often I find things too cluttered to pull a composition from, so it can be a trying process to find subject matter that is just right. It’s also very hard to explain to people you’re looking for more than a ‘derelict building’.

A classic Bathurst street scene with the morning sun and the old sofa on the verandah. It really sums up country living for me.

A classic Bathurst street scene with the morning sun and the old sofa on the verandah. It really sums up country living for me.

I fell in love with this purple flower only to discover later it’s a fairly prominent weed known as Paterson’s Curse.

I fell in love with this purple flower only to discover later it’s a fairly prominent weed known as Paterson’s Curse.

We stayed at Belisi Farmstay near Wagga Wagga and it was perfect. If you have kids (or not), I highly recommend a visit. My kids are not terribly used to animals, but loved getting out seeing the horses and collecting eggs in the morning.

I was surprised how far the canola extends and how the colour changes according to the light. In particular, overcast or cloudy conditions actually provided the most interesting light, really spotlighting certain sections of the field and giving them shape. Like I said, I could have spent forever driving around looking up compositions.

The colour of the canola really changes depending on the weather, which did make consistency in psot-processing difficult. I think in the end I simply decided to work on an image-by-image basis and forget consistency altogether.

The colour of the canola really changes depending on the weather, which did make consistency in psot-processing difficult. I think in the end I simply decided to work on an image-by-image basis and forget consistency altogether.

I lot of people think having a small strip of landscape at the bottom of the frame set against a large sky is part of my style, but it’s more of a function of the limited reach of my 50mm lens.

I lot of people think having a small strip of landscape at the bottom of the frame set against a large sky is part of my style, but it’s more of a function of the limited reach of my 50mm lens.

There’s a lot more than canola out this way, too. We visited the Temora Aviation Museum, the rather delicious (and dangerous or the waistline) Junee choc factory, as well as what is Australia’s most haunted house, Monte Cristo. My wife and daughter were happy to wait in the car for that one.

The shadow of a door handle in morning light. I thought this tied in nicely to the surrounding canola.

The shadow of a door handle in morning light. I thought this tied in nicely to the surrounding canola.

Windows wallpaper, anyone? There was no shortage of rolling hills.

Windows wallpaper, anyone? There was no shortage of rolling hills.

With most Australian states closed off to NSW for travel, it seems regional trips like this are the best way to get out and explore at the moment. It’s also a good way to show the kids holidays don’t have to be waterparks and shopping malls.

Head here for the full gallery of images.

I became somewhat obsessed with this abandoned petrol station at Wallendbeen. It had so much character and detail. I must have taken a hundred shots of it from every conceivable angle.

I became somewhat obsessed with this abandoned petrol station at Wallendbeen. It had so much character and detail. I must have taken a hundred shots of it from every conceivable angle.

I don’t think I’ve ever seen a Coca Cola sign so faded as to be almost pure white.

I don’t think I’ve ever seen a Coca Cola sign so faded as to be almost pure white.

ICM Photography Part II

It’s been a while since I updated everyone on how my ICM (Intentional Camera Movement) is coming along, so here we go. It’s slow going. I’ll take a hundred shots and not use a single one. Sometimes processing with take ten minutes, sometimes ten hours. But it is nothing if not rewarding.

I had been envisioning this image for quite a while, but it took me two or three trips to get just right. This is looking towards the Harbour Bridge in Sydney from the Circular Quay Ferry Terminal. You can see the red and white pylon marker on the l…

I had been envisioning this image for quite a while, but it took me two or three trips to get just right. This is looking towards the Harbour Bridge in Sydney from the Circular Quay Ferry Terminal. You can see the red and white pylon marker on the left, the iconic yellow and green of the ferry to the upper right. What I like most is the texture, which comes across as a mix between pencil and watercolour.

All of my ICM images to date have featured Sydney. I’ve tried not to rush it and focus on the really iconic parts of the harbour city. It really is a trial and error process, and I’ve come to learn there is actually a lot of technique to the initial capture. It is all about the movement of your wrist motion—the speed, amount of push and pull, spin… It’s not just shaking your camera around in the air, though that can also lead to a good result from time to time. Experimentation is key.

A GIF showing the build-up of this image in post-processing. It’s quite layer intensive, as you can see.

A GIF showing the build-up of this image in post-processing. It’s quite layer intensive, as you can see.

The other important element to making ICM work is to have a defined idea of not only what you want to shoot, but some idea of the composition. I find if I show up somewhere without having thought it through it leads to a scattered approach that doesn’t have a strong sense of composition, which is everything with images like this. At the least, you need a vague idea of where major focal points will be placed in the image before you ‘shoot’.

The Queen Victoria Building in Sydney. You can see the façade of the building in the back, the statue of Queen Victoria to the left and one of Sydney’s new trams moving through the bottom of the image.

The Queen Victoria Building in Sydney. You can see the façade of the building in the back, the statue of Queen Victoria to the left and one of Sydney’s new trams moving through the bottom of the image.

I feel like I’m starting to get my own feel as far as ICM images go. Something that has started to change is my use of colour. I’m pushing saturated colour far more than my original images, as you can see in the image of the QVB building above. I’m a big fan of paintings featured strong, vibrant colours, so I expect to see that filter through to my ICM photography as I start to improve and get more confident.

The famous Coca Cola sign at Kings Cross, Sydney. This one took a long time to put together over several weeks and was originally different colours completely, though I felt they made it hard to gauge the subject matter.

The famous Coca Cola sign at Kings Cross, Sydney. This one took a long time to put together over several weeks and was originally different colours completely, though I felt they made it hard to gauge the subject matter.

Things don’t always go to plan. I had this image in my head of looking up the road towards the Coca Cola sign at Kings Cross, now something of a historic monument, but when I got there I found there were too many trees and clutter obstructing the view, so I had to get much closer than planned. In the end it worked out, as above, but it was certainly frustrating at the time.

Hours and hours spent in Photoshop were required to get this particular image working. Sometimes when you’re not feeling something the best thing to do is simply walk away, which I did… several times over several weeks.

Hours and hours spent in Photoshop were required to get this particular image working. Sometimes when you’re not feeling something the best thing to do is simply walk away, which I did… several times over several weeks.

One final piece of advice, for the love of god make sure you correct for dust on the base image before duplicating it and playing around. I often get too excited and forget this basic first step. It means I end up with twenty layers in twenty different orientations and two specks of dust turning into two-hundred. Don’t be like me. Make sure you have a clean file to begin with.

I understand these images are not for everyone. They border on the truly abstract and venture far from traditional photography, but I’m enjoying myself, happy with the results and that should really be all that matters.

Regional NSW With the Sigma SD-H

Coming into the end of 2019 I realised I hadn’t had any photo trips per se. So, commitments aside, we headed off on a weekend road trip to regional NSW moving through Lithgow, Bathurst and Parkes.

This is the Bilpin Fruit Bowl, a spot I remember from many childhood mountain travels. I’d envisioned this shot for a long time but only now have got around to it. Sadly, two weeks later the fruit bowl was mostly destroyed by bushfire.

This is the Bilpin Fruit Bowl, a spot I remember from many childhood mountain travels. I’d envisioned this shot for a long time but only now have got around to it. Sadly, two weeks later the fruit bowl was mostly destroyed by bushfire.

The initial thing that struck me was just how dry it is out there in the country thanks to one of the worst droughts in Australian history. Many locals we spoke to indeed said it was the worst they had experienced. The rivers, dams and creeks were all bone dry, the land scorched and barren. This created constant dust and haze in the sky, which did make keeping the sensor clean (or not, rather, given how much the clone tool got a workout) interesting.

We pulled into our hotel at Parkes just as a dust storm engulfed the town. I ran across the road and was subsequently sand-blasted taking this shot.

We pulled into our hotel at Parkes just as a dust storm engulfed the town. I ran across the road and was subsequently sand-blasted taking this shot.

I especially like the banality of these country towns and the unique compositions they offer. We swung by the Parkes Historical Aviation Restoration Museum, which was especially photo-friendly. The texture and details in the planes was exquisite and could have kept me there for hours. Also worth a look was the State Mine Heritage Park in Lithgow, a real hidden gem I personally had never been to before.

The Chinese restaurant is a real country town staple in Australia. I have a particular fascination for them.

The Chinese restaurant is a real country town staple in Australia. I have a particular fascination for them.

I changed my processing a little for these images, using new LUTs I have created, though I can’t say I’m completely satisfied with the consistency between them all. This was made especially hard with the constantly changing sky and light conditions owing to the dust, plus ash and smoke from the NSW bushfires further afield.

The Historic Aviation Restoration Museum (HARS) in Parkes is a must-visit for photographers

The Historic Aviation Restoration Museum (HARS) in Parkes is a must-visit for photographers

As always, I was impressed with the detail picked up by the Sigma SD-H, especially in the textural abstracts I was taking. It’s almost ridiculous how much it soaks in. I did find myself jumping a lot between the 50mm 1.4 and 24mm 1.4 this time, which probably tells me I should be looking into the L-alliance 24-70mm Sigma has just released. I will also be extremely interested to see Sigma’s full-frame Foveon offering in 2020 and what advantages it provides over the SD-H. Increased dynamic range would be most welcome.

Having visited the region many times, I was surprised by how dry the drought has made it

Having visited the region many times, I was surprised by how dry the drought has made it

In 2020 I’m hoping to step up my landscape photography and get out to some new places, hopefully international. I still don’t think I have a signature style as such yet, and that’s what I’m hoping to explore, as well as constantly refining and minimalizing my compositions in the vein of excellent photographers like Bruce Percy and David Ward. Here’s to a new decade and new possibilities (and hopefully some rain for this sun-burnt land). See the full set of images by clicking here.

As we were coming home multiple bushfire fronts had sprung up, including this blaze near the Three Sisters at Katoomba. Since then the fires have spread in what has been one of the worst fire seasons on record so far. You can see one of the choppers…

As we were coming home multiple bushfire fronts had sprung up, including this blaze near the Three Sisters at Katoomba. Since then the fires have spread in what has been one of the worst fire seasons on record so far. You can see one of the choppers at work in the middle there.

A Guide To ICM Photography

I have been getting quite experimental with my photography this year and recently stumbled upon ICM, or Intentional Camera Movement photography. I fell into the work of photographer Andy Gray and was immediately blown away by the painterly feel of his images.

An ICM photo of Hornby Lighthouse in Sydney, Australia, my first attempt at the technique.

An ICM photo of Hornby Lighthouse in Sydney, Australia, my first attempt at the technique.

Thankfully, Andy has a wonderful YouTube channel where he breaks down step-by-step his entire process, from capture to post-processing. I definitely recommend checking it out to see just how much work goes into each image.

An ICM photo of the Sydney Opera House. Another ICM image of poppies from the Botanic Gardens has been used as a second exposure layered over the first.

An ICM photo of the Sydney Opera House. Another ICM image of poppies from the Botanic Gardens has been used as a second exposure layered over the first.

What’s required? Well, a camera, though megapixels don’t really matter given the abstract nature of the finished product, and also an ND filter. It seems something between a 6-stop and a 10-stop is what work’s best, allowing exposures within the 0.5-1.5sec  range during the middle of the day. If you wanted to skip the filter, I suppose you could shoot closer to sundown and sunrise where the exposures would be longer handheld. Like everything with this technique, however, there are no hard and fast rules. It is all about experimentation.

I opted for a 6-stop in 77mm to suit my Sigma 50mm f1.4 and also 24mm 1.4, a wider lens being the preferred option. At around $100 AUD, it’s not a terribly expensive way to get into ICM, plus you can use the filter for more traditional purposes.

The Sigma SD-H itself probably isn’t the best choice of camera. It buffers slowly and the RAW files are tedious to process when you get back home, requiring you to be somewhat picky when it comes to post-processing. Expect to take a lot of photos.

Another ICM image of Hornby Lighthouse. This one reminds of the famous aerial shots of Shark Bay in Western Australia

Another ICM image of Hornby Lighthouse. This one reminds of the famous aerial shots of Shark Bay in Western Australia

As for the process, if you watch Andy’s videos you’ll get an idea of the movement required. I set f11 and around 0.5sec, starting with a shaking motion and then a longer, whipping motion. I slowly worked up to longer exposures, trying to follow lines within the scene. It’s very much like painting… with a very expensive brush.

If there are people around, note this: You are going to look like an absolute idiot. One guy suggested ‘I don’t think that’s how you use a camera, mate’. I simply smiled back, not able to dial up a suitable comeback in time. I found the best results were when I really got into it, almost violent in the movement in able to create the required textural effect.

It’s also important you start with a regular composition in mind, just as you would if you were taking a traditional landscape. You need a prominent feature or point of interest the abstraction works around. So, frame up the scene as would normally and then go to town. I don’t have any castles or ruins nearby like Andy, but I do have Sydney Harbour and its many wonderful icons.

Another important point is to beware of highlights. It was an extremely bright day when I first tried this. Any small highlight source within the frame can easily ruin a shot by basically slicing it up with pure white. It’s a little hard to explain, but if you think you see specular highlights that are going to be blown out, avoid them in your movement.

This animation shows how the image at the top of this post was created using layers within Photoshop.

This animation shows how the image at the top of this post was created using layers within Photoshop.

Into post-processing and I simply looked for frames that stood out where the movement seem right and balanced, or the texture was right. From there it’s into Photoshop, stacking up the layers and running through masks and blend modes to find an initial base to work from.

Once the initial image has started to come together, it’s into Analog Efex Pro 2. Here, Andy uses a variety of tools to help further abstract and shape the image, but notably vignette, double exposure (inverting the image) and film effects. I found it also helped scrolling through the factory camera presets within Analog Pro 2 to see if anything worked, especially the ‘Motion’ cameras. Andy also uses Vivuza for spot adjustments, but I didn’t feel the need myself. As they say, there are lots of ways to skin the cat in Photoshop.

I think of post-processing in two parts: Colour and contrast, effectively leaving colour until last. I tried a curves layer first, adjusting RGB channels individually, but I couldn’t seem to make it work. Instead, I loaded up a LUT adjustment layer and simply scrolled through all the LUTs I have on file (which is quite a few) until I found something I liked and adjusted opacity from there. The Selective Color and Hue/Adjustment layers were good for fine-tuning.

Finally, I let the images sit there for days at a time, slowly tweaking until I thought they were good enough. It’s very easy to get stuck in a kind of ‘post-processing loop’ with these sorts of images, constantly adding and removing adjustment layers and masks, tweaking and tweaking and circling back on yourself. When I found myself doing this, I would turn off all layers except for the base exposure and add them back one by one adjusting as I went.

The above images show the interesting detail when seen at 100%.

Overall, I think I’m pleased with the results, though they are not what I expected at all. That’s the beauty of a style like this: You don’t know what you’re going to get. I’d love to make some prints and really study them.

I will say it was extremely frustrating at times. The images took a lot longer to process than usual largely in part because so much trial and error is required. It is rewarding, though, when you finally have something on screen that doesn’t look like a dog’s breakfast.

If you’d like to support Andy and his channel, you can do so here. Look out for more ICM work in the future.

An abstract view of Sydney Harbour created using the Intentional Camera Movement technique. Note what happened with the specular highlights on the water in the bottom right, but in this case I think it works.

An abstract view of Sydney Harbour created using the Intentional Camera Movement technique. Note what happened with the specular highlights on the water in the bottom right, but in this case I think it works.

Rattle & Hum Car Show With The Sigma SD-H

Many moons ago I was a car magazine editor. As such, you might say I have a certain appreciation for a fine automobile, plenty of which could be found at the 2019 Rattle & Hum car show at Castle Hill RSL. I decided to go along with the Sigma SD-H and 50mm 1.4 to see if I could hunt down some abstracts. The results came up nicely. Can you guess what models of car these are?

As this was an Australian vintage car show, you might not be familiar with some of these models, but there was plenty of American muscle on hand as well. I’ve found with this style high key-like photography I’m into these days that direct sun on your subject works best when it comes time to process. A subject in shadow can prove difficult to get the effect right on.

SDIM0678-copy.jpg

This is something I’ve be keen on shooting for quite a while, so I’m thinking about expanding it out to air and truck shows when I get a chance. If nothing else, it’s a great way to get the kids out exploring what everyone got around in back in the ‘olden days’.

SDIM0807-copy.jpg

Here’s the full gallery:

Tin City, Stockton Beach With The Sigma SD-H

I have many fond memories of the Stockton Beach growing up. Located about an hour-and-a-half from Sydney, access is 4WD only. It’s one of the few beaches along the coast where you can drive along the sand and, to a smaller extent these days, the dunes.

Amongst the dunes is a strange settlement of ramshackle structures known as Tin City. At first, rising from the sand, you expect to see a Stormtrooper and a droid, perhaps an Interceptor, but it’s actually the last legal squatters settlement in Australia.

The ‘city’ started in the early 1900s as tin shacks for shipwreck survivors. In the 1930s it grew out to around 36 huts, around 11 of which stand today, and yes, people were here the day I visited. As I understand it, the huts cannot be sold, but are sort of passed down from generation to generation. Since my last visit 20 years ago, many had been repaired and added upon, some looked pretty well sorted! Fishing seems to be the predominant pastime.

SDIM0530-copy.jpg

It didn’t stop raining all day, which meant we did have the beach to ourselves, but it did make photography difficult. I was initially disappointed, hoping for blue skies and strong light for the high  key style I use these days, but on reflection I like the way the rain added an ethereal mood to the images. It actually gels very well with the subject matter—lone buildings left out in the elements.

SDIM0509-copy.jpg

I also shot some of the dunes, focussing on some timber fencing that had fallen (read: been run) over. I like the minimalist feel of these images and hope to return to take more. Of course, the famous wreck was another shoot hot spot but it was, drum roll, underwater when we arrived. Next time.

SDIM0638-copy.jpg

Check out the full gallery:

Prism Fun At The Sydney Royal Easter Show (Fuji X-Pro2)

Recently I sold all my Canon gear and moved to a Fuji system (X-Pro2) for my personal photography. I still have the Sigma SD-H for my landscape projects, but the Fuji comes out whenever a family friend wants portraits or there’s a birthday party, etc. The quality of the JPEGs it produces has cut down significantly on my processing time… and I find I have less and less of the latter as the kids grow!

DSCF1063-copy.jpg

I’d already taken my Sigma to this year’s Royal Easter Show, focusing on daytime abstracts of the carnival area, which you can see here. However, the thought occurred to me I should bring the Fuji X-Pro2 and 40mm f2.8 pancake lens back at night to see if I could get some interesting high-ISO shots. As I was gearing up at home, I noticed a glass prism I had bought for playing around with portraits of the kids (see below) and decided to throw it in and see what I could come up with.

The result, as you can see, is fairly interesting. The prism lent itself perfectly to the clash of colours and lights you see at a carnival. Did it inspire some strange looks seeing me wrangling this piece of glass in front of the lens? You betcha, but I’m happy with the results, which have a nice Blade Runner-cum-Tron-cum-’80s movie poster-type feel to them. I’m thinking it may even be worth exploring a little further.

The prism was originally intended for portraits of my children. It’s really quite fun to play around with.

The prism was originally intended for portraits of my children. It’s really quite fun to play around with.

DSCF1071-copy.jpg
DSCF1048-copy.jpg

What do you think? Am I losing the plot. If it’s anything like my hair, that’s very likely. Perhaps I’ll get a couple printed up just because. In the meantime, here are the remaining images:

Finally, there was one image I took without the prism using the Sigma, just to see how far I could push it (Read: Pretty damn far NR-wise with the new Sigma Photo Pro). The image was out of focus and far from sharp, but I still love the look of it. It’s a wonderfully retro vibe to it.

New Zealand With The Sigma SD-H

I’ve decided to title this latest series Long White (all images here), not after New Zealand itself, but the cruiseliner we travelled on. I was born in Auckland, have returned many times over the years, but I found travelling this way offered a new and unique perspective. It also provided the opportunity to visit many ports and cities I otherwise would never have seen, such as Port Chalmers, Dunedin, Picton, Akaroa and so on.

Milford Sound offered mood in spades. It’s a South Island must-see.

Milford Sound offered mood in spades. It’s a South Island must-see.

Once more I aimed to look for the unique in the ordinary and seemingly banal. I’m constantly trying to refine my compositions down, to really simplify them to their most essential elements. It was an interesting journey. In fact, I found a lot of material in the ports themselves, the higher vantage point offered by our balcony provided a sort of aerial view.

There was plenty of visual interest in the ports, the cruiseliner we sailed on offering a high perspective.

There was plenty of visual interest in the ports, the cruiseliner we sailed on offering a high perspective.

Of course, a cruise is also the perfect way to see the sounds of the South Island. We travelled through Milford, Dusky and Doubtful. They are, as you would expect, extremely scenic, especially layered in mist and cloud, the sun breaking through sporadically. If you have never been to New Zealand, and especially the South Island, do make it a priority. There’s endless photographic material.

Finding a way to show the scale of Milford Sound and its towering peaks can be difficult.

Finding a way to show the scale of Milford Sound and its towering peaks can be difficult.

Many would say light is the most important element of photography, but I disagree. For me, composition trumps all else, and while great light is nice, it’s not essential to making an interesting photograph. Unfortunately, composition is one of those elements of photography that’s hard to learn, hard to teach and ultimately in the eye of the beholder. I don’t think even in the space of a lifetime you could master it.

My favourite image of the trip, taken in Dunedin. The city itself was full of art and life.

My favourite image of the trip, taken in Dunedin. The city itself was full of art and life.

In terms of equipment, I took the Sigma SD-H with the 50mm f1.4 ART and left the 24mm at home. I didn’t find I had need for a wider focal length, so I think the ‘one body, one lens’ idea will carry through from now on. I prefer it this way, getting used to the one focal length and not having to change lenses, to remove one more barrier or choice, of thinking, during a composition. The more I can minimise my gear and photography to its most essential elements, the better.

As usual, the Sigma performed extremely well. The weather sealing on the SD came in useful. For the first time I had to raise ISO during our trip through the sounds owing to the dark, wet, and windy conditions. It was a real test for both photographer and camera.

edited.jpg
A tight crop of the image above showing the impressive detail the Sigma SD-H is able to capture.

A tight crop of the image above showing the impressive detail the Sigma SD-H is able to capture.

I also find myself watching a lot of film channels, such as William Verbeeck’s, Negative Feedback and so on, and idolising many film photographers as well. I’m still tugged towards film from time to time, the tones and feel, so perhaps the next trip I will take both the Mamiya RB67 and the Sigma SD-H, to compare and try to settle this once and for all.

The colours here really say New Zealand to me, the green and black and white. I think the fact this crop means the word parlour has a sense of ambiguity about it.

The colours here really say New Zealand to me, the green and black and white. I think the fact this crop means the word parlour has a sense of ambiguity about it.

Am I happy with this series? Yes and no. With Broken there was only ever one type of weather: real damn hot and bright as can be. In New Zealand, you could have four or five different weather systems in the space of an hour, the darker and moodier of which don’t work well with the usual post-processing treatment for these images. As such, I worked on the more traditional landscapes as if they were just that.

I guess cohesion is the issue. I wanted a cohesive look to the images, but they seem to be in two camps: modern minimal and LOTR eat-your-heart-out. Still, I’m happy with many of the final compositions. This observational style of photography has really opened up a world of possibility for me, because you don’t need to chase light, so to speak, nor seek out grand landscapes. You’re simply looking for anything of visual interest.

Where to next? I have no immediate plans, but stay tuned. You never know where I’m likely to pop up.

There were plenty of compositions to be found on the ship itself.

There were plenty of compositions to be found on the ship itself.

These striped pedestrian crossing poles are unique to New Zealand (I think), but it took me a while to find a suitable background for one.

These striped pedestrian crossing poles are unique to New Zealand (I think), but it took me a while to find a suitable background for one.

SDIM0850-copy.jpg
SDIM0892-copy.jpg