For the last couple of years I’ve been agonizing over a replacement camera for my landscape work. My Canon 5D MkII served me well, but it was time to move on. At one stage I was a mouse click away from an A7R, looking forward to the increased dynamic range, portability and lack of an AA filter. When I started looking a little closer at the kind of photos I wanted to produce, however, I realised what I really wanted was the look and feel of medium format, that depth, detail and clarity you can never get with a 35mm sensor. So, I got serious about an older Phase One, something like a P25+ in the range of $10,000 AUD second-hand with body. I realised it would be no good at high ISO, slow and outdated, but it seemed like the only way to get on the Phase train.

Sigma DP1 - Looking up at orange lichen-covered rocks at Cape Forbin on SA's Kangaroo Island. f10, ISO 100 1/3sec
The Pentaz 645Z popped up. I started looking at the older 645D as well, but both were still a grand investment. This was around the time award-winning Australian landscape photographer Christian Fletcher started preaching the Sigma Quattro gospel. I’d looked at the Quattros before, thought of them as a gimmicky love child of a boomerang and a remote control, but the more I looked at Christian’s Sigma files, the more I could not tell them apart from those shot with his Phase. Even Christian himself admits the Sigma Quattros are ‘medium format in your pocket’ and some of the best value cameras on the planet. When he told me you can happily print the Sigma files up to 60x40 inches without a problem, I was sold. Combine that with a frame and you’ve got a serious piece of art on your hands. It’s certainly large enough for my purposes.
Honestly, the last camera I expected to buy was a Sigma Quattro. I was expecting to pay $10,000 for a medium format camera, not $999 for a glorified compact, but I’m glad I took the gamble. What I’ve discovered since is that Sigma’s Foveon sensor combined with the fixed lenses of the Quattro series provide mind-blowing amounts of detail and a dimensionality (there’s a word for you) much more in line with medium format. It instantly stands out. I look at my Canon files now (anything non-Foveon, actually) and cringe. The Sigma ‘look’ is something that cannot really be defined, but something I believe will help distinguish my images from everyone else's out there. As someone said once, somewhere, in some place, if everyone is headed in the same direction, the only to stand out is to go against the stream. Amen.

Sigma DP1 - The unusual and remote Cape Borda Lighthouse. Defined subjects like this work very well when converted to 32bit HDR files from the DP1 if you want to suck out every last drop of detail. ISO 100, f7.1 1/125sec
ERGONOMICS
To put the Quattro DP1 to the test, I recently thrashed it on a three-day family holiday to South Australia’s Kangaroo Island, staying at the remote Cape Forbin. I took my 5D MkII as well, mostly for shots of the kids, but what actually happened is that the only shots the 5D took were of the Sigma.
The Quattros are fixed lens but come in a few different models. I went with the DP1, around 28mm converted, so wide, but not ultra wide. Much like Sigma’s Art-series lenses and complete brand overhaul, the Quattros share that same Batman-esque, minimalist aesthetic, one that has actually grown on me. Many have been quick to level criticism at the camera’s handling, but once you know how to hold them they’re actually much extremely stable (see here).
The slick styling runs into the menus and every aspect of the camera. It really is a stripped down, image-dedicated machine without fluff like video and 10,000 user modes. It has few buttons and many quirks. For example, shutter speed is limited to 30sec, ISO is only really decent between 100-400 before serious noise and the screen's a bit hard to see in direct light. Once you get to grips with everything, though, and the minimalist approach, it’s actually a beautiful and very simple camera to use.
Almost always looking for maximum detail and DOF without diffraction, it was simply a case of setting focus to infinity on screen, manual mode, ISO 100, a 2sec timer and somewhere typically between f8-f11. With those settings locked in, I found I was freed up to spend more time on what matters—subject and composition.
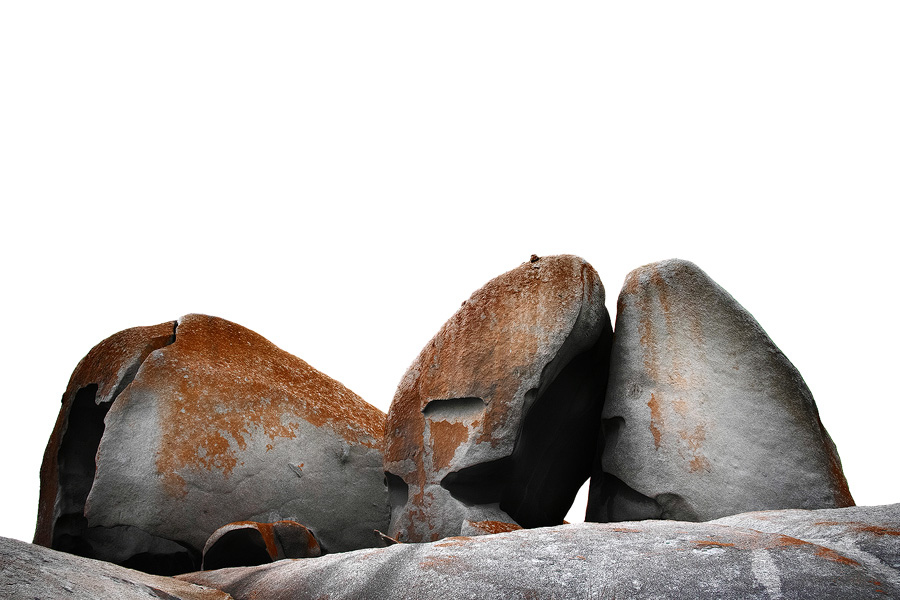
Sigma DP1 - The infamous Remarkables are massive, the size of houses, and a perfect study in composition. ISO 100, f8, 2sec
This is where the Sigma has improved my photography. I had to work within the constraints of the camera. That forced me to think and to shoot in different and unique ways. It was so refreshing not having to consider what ISO I needed, what f-stop and what lens to grab. All that was removed, allowing me to concentrate on the landscape itself and spend my time poring over possibility,
From the very first image that popped up onto the back of the camera, I knew I was onto something. I don’t know what voodoo is going on in that sensor, how many virgins have been sacrificed putting it together, but it is amazing. Almost like film, I’m dying to get back home and open the files up to 100% just to see the detail gathered—every little pebble, grain and blade of grass. The lack of an AA filter helps, but it’s the fact Sigma has been able to match the lens perfectly to the body that delivers such incredible results. Just look at what they’re doing with those Art lenses of late.
The portability is a thing of beauty. Medium-format cameras weigh a ton, as do DSLRs to an extent. This was like carrying around a feather. My Induro tripod (number six in a long line and the best so far) weighs about five times as much as the Sigma. The two look especially silly combined together, but I like things rock solid. And yes, you can fit the Sigma in your pocket, albeit awkwardly. It just looks a bit… weird. Definitely don’t try it on the subway.

Yes, the tiny Sigma looks very, very silly atop my Induro tripod, but its strength lies in its portability.
It’s all so damn light in the backpack. Hell, you don’t really need a full backpack for it. You’d never guess it either, but the Sigma attracts a lot of attention from other photographers, mostly keen to see what the hell that “doorstop-looking thing” on your ballhead is. True story.

Sigma DP1 - The use of a polariser did away with glare and allowed the camera to see right through the crystal clear water surrounding Kangaroo Island. ISO 100, f11, 1/2sec
PROCESSING
Workflow has been serious issue for most who have tried the Quattros. They key is keeping it consistent. I shoot RAW and JPEG HI together. This allows me to quickly look through the JPEG files back home to see what I want to process before moving into the Sigma RAW editor, Sigma Photo Pro 6.
Much has been written about Sigma Photo Pro, most of it scathing. Many suggest it’s a deal-breaker in terms of speed, but with recent firmware updates I found it fine. You wouldn’t want to process a wedding with it, no, but for landscapes and a small group of files, it’s more than adequate. Speed isn’t blistering, but even with my humble PC it was a non-issue, especially batching.
The software itself is actually quite good. It really makes the most of the RAW files, tampering noise and doing away with the fringing that seems to plague this sensor. The fill-light function in particular is rather magical. Even shadows can be rescued significantly.
For more urban or structured images, I will use the camera’s in-built auto bracketing to shoot +2 0 -1 and then convert this to a 32bit HDR image in PS. It can then be worked on like a RAW file retaining all detail. The clarity slider can be pushed to new extremes in this way. Often, though, I find myself processing a single RAW file, or even using the JPEG if there are no fringing or noise issues that need addressing in SPP.

Sigma DP1 - A handheld shot down by the beach at Cape Forbin. Sometimes I find that when you can't find a comp or something interesting looking ahead, you have to look down. ISO 100, f5.6, 1/100sec
From SPP, I shift over to Photoshop for the bulk of processing. Oddly, I’ve found myself doing less processing than I normally would with these files. I’m also adding a lot less sharpening, actually removing it on the web files in many cases. Colours in particular took some getting used to given they’re much more on point. I use the ProPhoto colour space almost exclusively but sometimes delve into the Joseph Holmes DCAM 3 profiles if an extra push is needed.
Note that the dynamic range of the Quattro isn’t amazing compared to the Sony sensors. It tends to be quite harsh with highlights especially, but this is nothing to worry about if, like myself, you are familiar with blending exposures with the use of luminosity masks and the like. It’s a bit of extra effort in post, but given the extra detail and depth offered by the Sigma, I think it’s worth it. It’s also possible to focus stack, but I found at f8, f11, etc. I had no issues with DOF.

Sigma DP1 - You can bet I was hanging onto both tripod and camera real tight hanging out into the open over this drop. ISO 100, f8, 1/3sec
IN THE FIELD
Because it was winter, the weather was really on and off during the trip. Sun, rain, fog, seaspray, mud… the Sigma took it all on and came out unscathed. It does burn through a lot of batteries (Sigma actually supply two in the box), so I took four with me, but really the kit was super simple—the camera, a cloth and two filters (an ND10 and a polariser in 77mm). I just held the latter against the lens when I needed them, but in the future I might grab some with the right thread. I did have a release for the Sigma, but the 2sec timer was so effective I found I didn’t need it, so don’t waste your money. The ND10 was probably overkill given the 30sec exposure limit, so perhaps consider something a little less savage if you’re a fan of long exposures.

Sigma DO1. Yes, the Sigma does handle long exposures up to 30sec (camera limit) fine with no additional noise. ISO 100, f10, 20sec ND10
I’d read from the internet elite the Quattros were useless handheld, with poor AF and read times that killed any idea of candid shots. Funnily enough, I ended up using it for all the shots of wildlife/kids (same thing, really) on the island. In decent light the AF is surprisingly fast, and accurate. The colour rendering on the Sigma is also much better than the Canon, and the detail… well. That said, it works brilliantly tone- and detail-wise for the porcelain skin of kids, but your SO might not be too happy when you look at the files and can suddenly see every single little wrinkle and pore on their face.
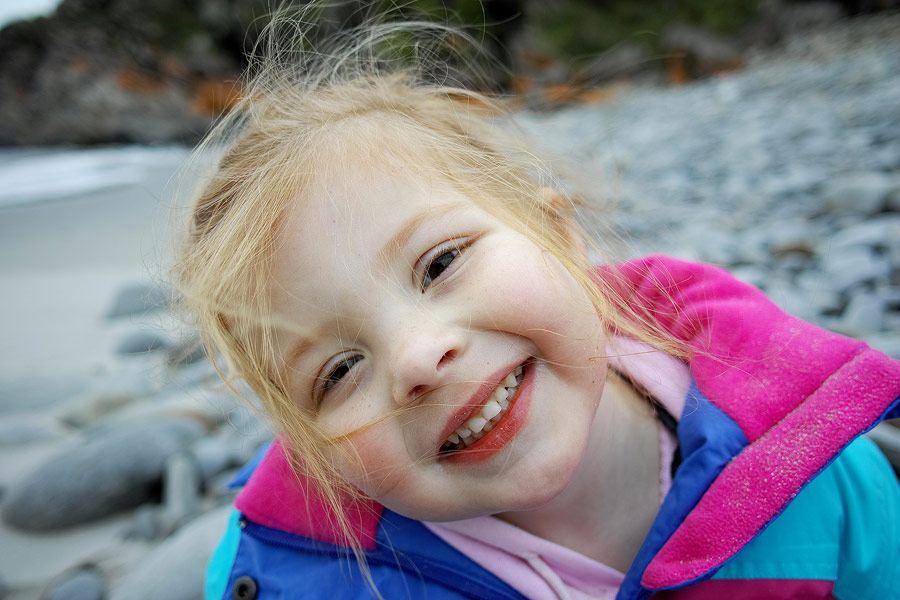
Sigma DP1 - A candid of my daughter Emilie. I actually found AF to be surprisingly good. ISO 100, f2.8 1/320sec. Here's a look below at 100%. Note the detail in the hair above and below the lips and even specs of sand on her face even at f2.8. This is a straight JPEG from the camera. No additional sharpening added.

THE WHY
To wrap up, this is a perfect example of why you can’t always buy into what you read online, especially from keyboard warriors stuck taking pictures of their cats and coffee mugs. Take the advice of those out there using this stuff on a regular basis and be surprised. I know I was. I’m excited about photography again, excited about getting out there and then getting home to check out the tones and detail offered by the DP1.

Sigma DP1 - The Quattro DP1 is especially good in B&W thanks to the tonal graduation offered by the Foveon sensor. ISO 100, f8 10sec
It is said a good photographer doesn’t need good gear, but I think you should still be inspired by the equipment you have. The Sigma has provided this inspiration. There’s a lot it won’t do, but what it does do it does amazingly well. I’m actually going to grab a second Quattro soon in the telephoto range (DP3). I think the combination of semi-wide and tele will allow for most subjects. Stay tuned for more on the Super Sigs soon. In the meantime, check out more images from the trip on 500px.
Sigma DP1 - The grass was especially green after recent rains. ISO 100, f16 1/15sec
Note: If you’re keen on giving the Sigma a go (and for $999 you’d be mad not to), I highly recommend Team Digital in Western Australia. PS: They’re also Phase dealers should you need to forgo a house deposit and grab the medium-format real deal instead.
Note note: I am not sponsored by Sigma (sadly). These are just my honest and truthful impressions of the camera. Don’t buy one. Just like Kangaroo Island, It’s probably best kept a secret.

Sigma DP1 - That water. Second Valley heading towards the Cape. ISO 100, f8, 1/20sec (blended)